Managing Signing Keys
This page explains how to manage keys used for signing and verifying MDS files.
Overview
MDS files saved in MIDAS are digitally signed. Digital signatures let the recipient confirm who created an MDS file. This helps judge whether the analysis comes from a reliable source.
Whether to trust an MDS file depends on the signer's trust level. There are three trust levels:
| Trust Level | Description |
|---|---|
| Official | Signed by MIDAS operator's key |
| Trusted | Signed by your own key (self-signed) or a registered public key |
| Unknown | Signed by an unregistered signer |
A self-signed file appears as Trusted only on the device that signed it. On a recipient's device it appears as Unknown unless they have registered your public key. By default, the trust level does not affect whether a file can be opened; files with unknown signatures also open without a warning. See Opening MDS from Unknown Signers for details.
Key pairs (a private key and public key) are stored in the browser's IndexedDB. Clearing the browser's site data also deletes the key pair. If you lose the key, you can no longer sign with the same key, so create a backup early. Signing keys are managed in the Signing Keys tab of the Settings dialog. Select Help > Settings... from the menu bar, then click the Signing Keys tab.

How Digital Signatures Work
The digital signature on an MDS file is based on public-key cryptography. The signer signs the file with their private key, and the recipient verifies the signature with the signer's public key. If the file content changes after signing, verification fails, so tampering and corruption can be detected.
What a digital signature confirms is who created the file. Even a valid signature does not guarantee that you can trust that author or that the file content itself is safe.
Keep your private key only on your own device and never give it to anyone. Share only the public key file produced by Export Public Key. A key pair backup file contains your private key, so do not give it to others.
A signature does not encrypt the file content. Anyone who obtains an MDS file can read its content, signed or not. If the file requires confidentiality, protect it with OS disk encryption or another encryption method.
The signer name included in a signature is self-declared. To confirm that a key belongs to the stated person, compare fingerprints instead of relying on the name.
MIDAS has no central key server. The trust level depends on whether the recipient has registered the signer's public key. If a signer deletes or regenerates the key on their own device, the recipient's registrations and the verification results of existing MDS files are unaffected. To have recipients use the new key, distribute the public key again.
Fingerprint Verification
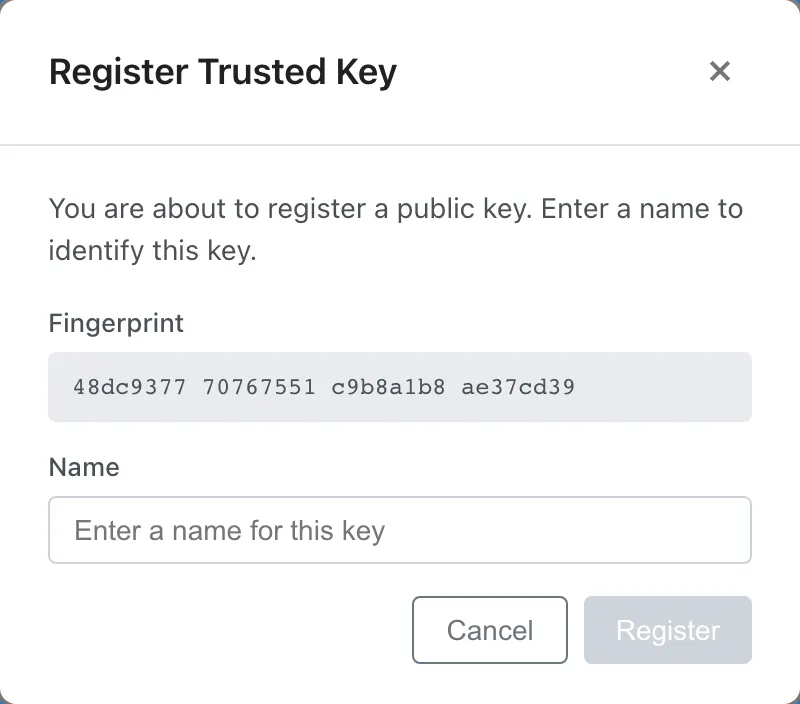
A fingerprint is a 32-digit hexadecimal number calculated from the public key and uniquely identifies it. By comparing fingerprints, you can confirm that the public key you are about to register really belongs to the other person.
To compare fingerprints:
- The sender opens Help > Settings..., checks the fingerprint in the My Signing Key section of the Signing Keys tab, and posts it somewhere separate from the public key file, such as their own website or email signature
- The recipient compares the fingerprint shown in the Register Trusted Key dialog with the posted fingerprint
If the two match, the public key you are about to register really belongs to that person.
When Signature Verification Fails
If the file content changes after signing, it no longer matches the signature and verification fails. The same applies when the file is corrupted in transit, such as in an email attachment or cloud storage. MDS files that fail verification cannot be opened. Ask the sender to resend the file.
A verification failure is different from an unregistered signer (Unknown). With Unknown, the signature itself is valid and the file opens. A verification failure means the signature is cryptographically invalid or the file is corrupted, and the file cannot be opened.
Managing Your Key Pair
Generate a New Key
When you save or export an MDS file for the first time, a key pair is automatically generated (the signer name defaults to "Anonymous"). If you leave it as Anonymous, recipients cannot tell who created the file, so change the signer name early. To generate manually, click the Generate New Key button in the Signing Keys tab. If a key pair already exists, this button is disabled. To generate a new key, first delete the existing one.
Enter a signer name in the dialog. This name is included in the signature and displayed when other users open the file.
Export Your Public Key
To share your public key with other users, click the Export Public Key button. A JSON file will be downloaded.
By giving this file to people you want to share MDS files with, they can verify that you are indeed the author of the MDS files when they open them.
The public key file itself is not secret, so you can hand it over by email attachment or an internal file server. So that recipients can confirm the key is yours, post your fingerprint on your own website or in your email signature.
Back Up Your Key Pair
To migrate your key pair to another browser or device, create a backup.
- Click the Backup Key Pair button
- Enter a password (required for restoration)
- Re-enter the password to confirm
- Click the Export button
The backup file is encrypted with the password. Store it in a safe place, as you cannot restore it if you forget the password. For the encryption method, see Privacy and Security.
Restore from Backup
To restore a key pair from backup, click the Import Key Pair button. This is a different button from Import Public Key, which registers another person's public key.
- Select the backup file (
.json) - Enter the password set during backup
- Click the Import button
If an existing key pair exists, it is overwritten without confirmation. Overwriting loses the original key, and existing MDS files signed with it are no longer treated as Trusted. Back up your current key before importing.
Change Signer Name
Click the Edit button next to the name in the My Signing Key section to change the signer name. The change applies to subsequent saves and exports. The signer name in MDS files you have already exported does not change.
Delete Key Pair
Click the Delete Key button to delete the key pair. Unless you backed it up beforehand, a deleted key cannot be recovered. If you generate a new key after deletion, it has a different fingerprint from the previous one. To have recipients keep treating your files as Trusted, distribute the new public key again.
Registering Others' Public Keys
By registering a public key received from another user, you can treat that user's signatures as trusted.
Import a Public Key
- Click the Import Public Key button in the Trusted Keys section
- Select the public key file (
.json) - Verify the fingerprint
- Enter a name for identification
- Click the Register button
Verify the fingerprint to confirm the authenticity of the public key. The procedure is described in Fingerprint Verification.
Edit Registered Key Name
Click a key in the Registered keys list to view details. Click the Edit button to change the name.
Delete Registered Key
Click the Remove button in the Registered keys list to unregister. After removal, signatures from that key will be treated as Unknown.
About Official Keys
The Official section in Trusted Keys displays the MIDAS operator's keys. Signatures from official keys are always treated as trusted. Official keys are built into the MIDAS application and require no registration.
Official keys cannot be edited or deleted.
Opening MDS from Unknown Signers
By default, MIDAS opens MDS files with unknown signatures without showing a confirmation dialog. This is because paths from unknown-signed files to external servers are blocked at load time, regardless of trust level. See Opening files with unknown signatures for details.
The signature badge in the top-right of the menu bar shows the trust level of the current project. Click the badge to see the full fingerprint and optionally register the signer as trusted. For more on the badge, see Signature badge and trust levels.
Recommended: Before receiving MDS files from a collaborator, ask them for their public key and register it as trusted. Then all files signed with that key open as Trusted without further action.
Show a confirmation dialog for unknown signatures
If you regularly receive MDS files from untrusted sources, open Help > Settings... and enable Require confirmation for unknown signers on the Security tab. With this setting on, a confirmation dialog appears every time you open an MDS file signed with an unknown key.
The dialog displays the signer's self-declared name and fingerprint, and offers three choices:
- Cancel: Close the dialog without opening the file
- Trust this signer and open: Enter a name for the signer, register their key as trusted, and open the file in the same step
- Open Anyway: Open the file once without registering the key
Note: The signer's name is self-declared. To confirm that a key really belongs to the stated owner, compare it with the fingerprint they have published. When receiving MDS files for the first time, we recommend asking for the public key as well.
See also
- Privacy and Security - Signature algorithm, key design decisions, and what to do if a key leaks
- MDS Files - Project file structure and digital signatures
Also available as a Markdown file.