The Filtered Data Tab
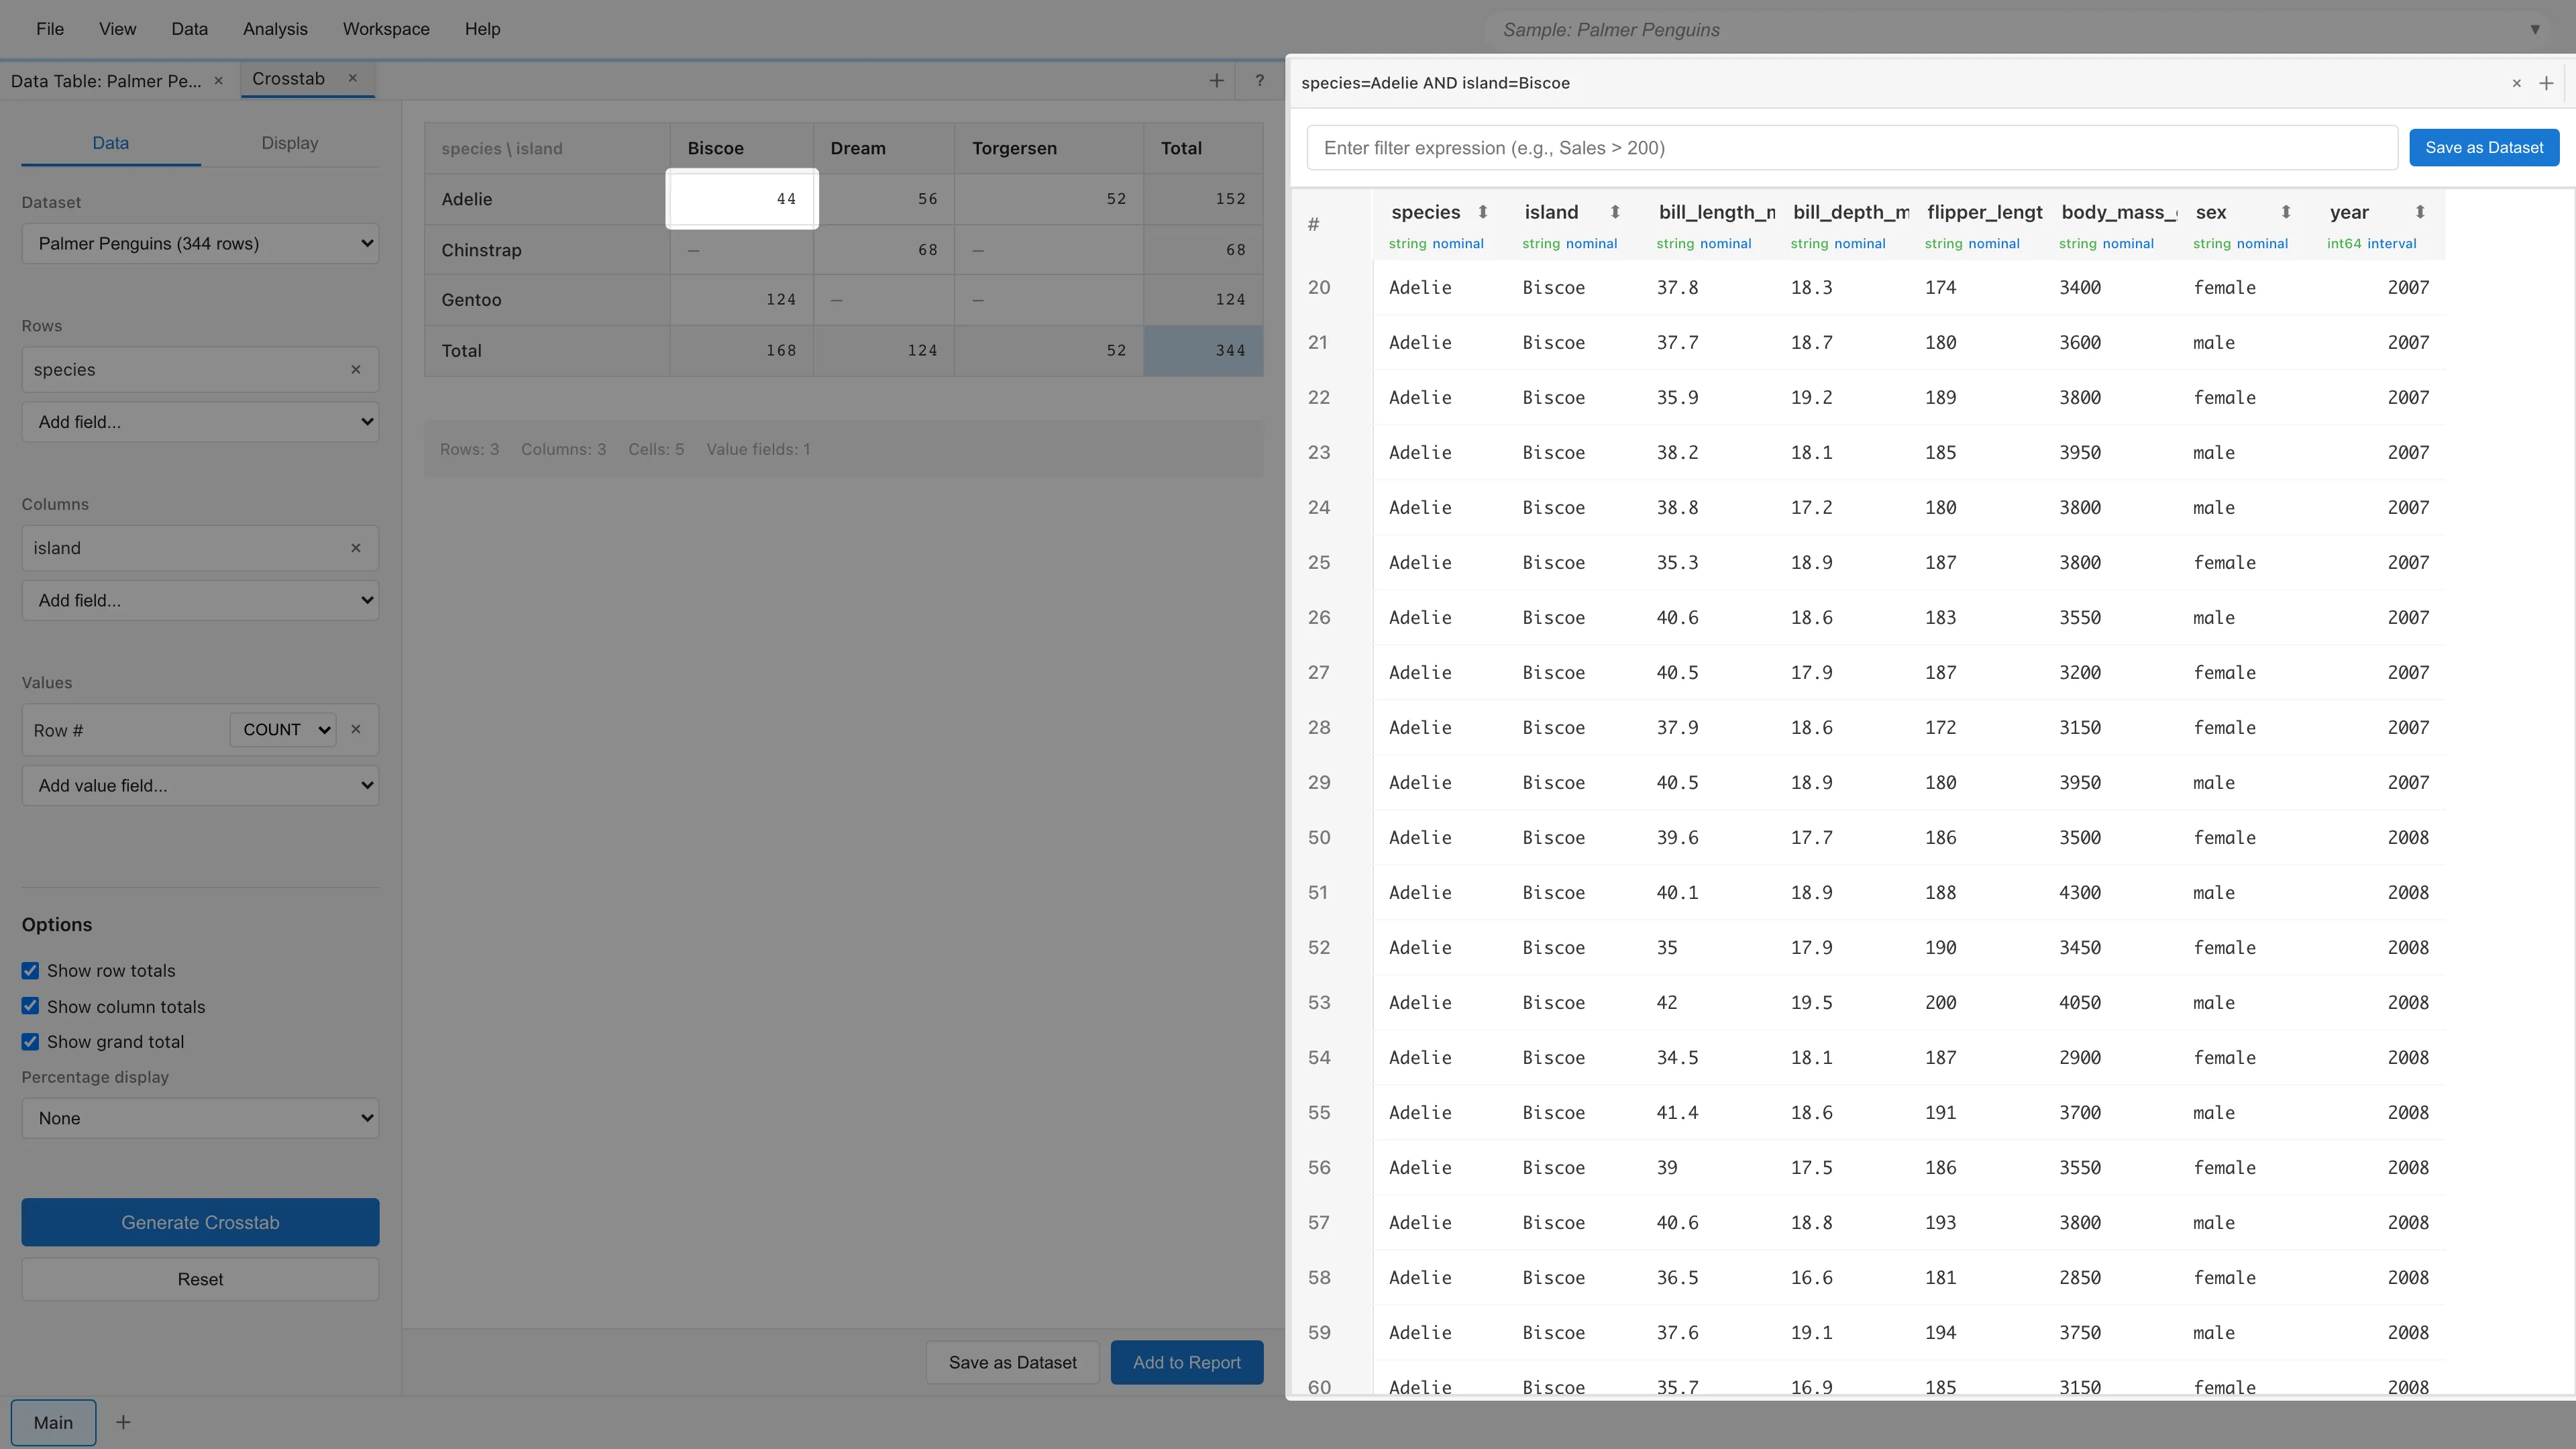
The Filtered Data tab opens when you double-click an element in a graph or cross tabulation to view its detailed data. It displays the rows corresponding to the element you double-clicked, and lets you add filters or save the data as a derived dataset.
When It Opens
The Filtered Data tab does not exist by default. It is created by these actions. Each action adds a new tab, so multiple Filtered Data tabs can be open at the same time:
- Double-click a data point or bar in Graph Builder
- Double-click a chart element (histogram bar, category bar, pair detail scatter plot point, time series point, etc.) in the Statistics tab
- Double-click a cell in Crosstab
- Right-click a histogram or Date Distribution chart in the Statistics tab, or a graph in Graph Builder, and choose Open as Filtered Data
Each action automatically sets the appropriate filter condition. For example, double-clicking a histogram bar shows only the rows within that bar's range. Double-clicking a Crosstab cell shows the rows matching both the row category and column category of that cell. The right-click Open as Filtered Data opens the tab with the current selection expression rather than the condition of a single element. Open as Filtered Data appears in the menu only when a selection expression exists.
One exception: when a Graph Builder graph that draws a derived dataset declares its underlying data with Select & drill down on, double-clicking an element opens a Contributing rows tab showing the underlying rows instead of a Filtered Data tab.
What It Shows
This tab displays the rows matching the filter condition. When the source data changes, such as by cell edits or a reload with Reload Dataset, the tab reapplies the filter condition to the current data and updates the display. If the filter expression has become invalid for the source data, the tab reports an error and keeps the previous display. This happens when a column referenced by the filter expression has been removed from the source data, or when the data type of a column has changed and made the expression invalid. Closing the tab discards the data, so save any data you want to keep using Save as Dataset.
A filter expression input field is at the top of the tab. You can enter additional conditions to further narrow down the snapshot. The syntax is the same as Data Table filters.
When an additional filter reduces the row count, the filtered row count is displayed. For example, if the original data has 44 rows and the additional filter narrows it to 30, "Showing 30 of 44 rows (filtered)" is shown.
A Save as Dataset button is to the right of the input field.
The table supports clicking column headers to select columns and clicking rows to select rows.
The table shows values with the display format set on the columns of the dataset the filter was applied to. A column with a number format or link display shows the same format in this tab. You cannot set a display format from this tab.
Actions
Adding a filter expression -- Enter a condition in the filter input field to further narrow the data. Click the X button at the right edge of the input field to remove the additional filter. When you save with an additional filter, the original filter condition and the additional filter are combined using and. For example, if the original condition is x >= 10 and x < 20 and the additional filter is y = 'A' or y = 'B', the saved derived dataset contains rows that satisfy both x >= 10 and x < 20 and y = 'A' or y = 'B'. The combined condition is equivalent to (x >= 10 and x < 20) and (y = 'A' or y = 'B').
Contributing rows -- Right-click a row and choose Contributing rows to pull the rows it came from out of the dataset the filter was applied to and show them in a Contributing rows tab. When several rows are selected, all selected rows are used. When that dataset is itself built from another dataset, a submenu lets you choose how far back to trace. When the rows cannot be traced back, the menu item is disabled and a tooltip gives the reason.
Save as Dataset -- Saves the displayed data as a derived dataset. Clicking the button opens a dialog. The dataset name field is pre-filled with a string describing the filter condition; save it as is or edit it as needed. The derived dataset references the source data by filter expression. When the source data is updated, such as by cell edits or a reload with Reload Dataset, the filter expression is re-evaluated to return matching rows. When the save completes, the Filtered Data tab closes. The saved derived dataset appears in the dataset list in Project Overview and can be selected from the dataset dropdown in other tabs.
A saved dataset never references an Ephemeral Dataset. The displayed data can depend on the unsaved view of another Filtered Data or Contributing rows tab, for example when it was filtered from a Contributing rows view. In that case the dialog names the unsaved views, and the save stores them as datasets at the same time. Each is named after its view, with a number appended when a dataset of that name already exists. A view whose filter or lineage matches an existing derived dataset is not saved again; the saved dataset references the existing one instead. When the tab of an unsaved view has already been closed, the view can no longer be re-derived, so the Save as Dataset button is disabled and shows the reason. The Contributing rows tab also has a Save as Dataset button. It saves the displayed contributing rows as a derived dataset, handles unsaved views in the same way, and leaves the Contributing rows tab open.
Editing a Saved Filter
A derived dataset saved with Save as Dataset can be edited. Right-click a dataset in the Project Lineage tab, or open the dataset menu (⋮) in Project Overview, and select Edit Operation... to open edit mode with the source dataset and filter expression restored.
In edit mode, if other datasets, models, or reports depend on this dataset, a warning is displayed showing the type and count of affected items. Editing the filter expression updates the filtered preview immediately. Changing the source dataset keeps the filter expression unchanged. If the filter expression is invalid for the new source, clicking Update Dataset shows an error and does not save. This happens, for example, when the filter expression references a column that does not exist in the new source. You need to rewrite the filter expression to match the new source.
If the transformation is changed from another path such as another edit tab or the Agent API between the time this tab opens and the time you click Update Dataset, MIDAS stops the save and shows a dialog. This keeps the earlier change from being lost without warning. The dialog shows the transformation as it was when the tab opened next to the version changed elsewhere since then. Choose Overwrite with This Tab's Edits to save the edits in this tab over the version changed elsewhere. Choose Keep Editing to return to the edit tab without saving; the edits stay in place, and saving again shows the same dialog.
Workflow Example: Extract Data from a Histogram Range
- Double-click a bar in a Statistics tab histogram
- A Filtered Data tab opens showing the rows within that bar's range
- Optionally enter additional conditions in the filter input field
- Click Save as Dataset, confirm the dataset name in the dialog, and save
- The Filtered Data tab closes, and the saved derived dataset becomes selectable in other tabs
Relationship with Row Selection
A Filtered Data tab is created by actions such as double-clicking, and once open, what it shows does not depend on the row selection state. Its data remains even after clearing the selection.
See also
- How Row Selection Works -- How to select rows in each tab and how selection state is shared
- Datasets -- Details on derived datasets
- Data Table -- Filter expression syntax
Also available as a Markdown file.