The Data Table Tab
The Data Table tab displays a dataset as a table of rows and columns1. In this tab you can filter and sort rows, select rows and columns, configure columns, exclude rows, edit values, and export and reload the dataset.
You can open a Data Table tab from the dataset list in Project Overview, from View > Dataset in the menu bar, or from the + button in a pane.
You can open several Data Table tabs for the same dataset. The filter expression, sort conditions, and column widths are settings of each tab and do not affect other tabs of the same dataset. When you save the project and open it again, each tab opens with the settings it had when you saved.
Screen Layout
The Data Table tab consists of the parts numbered 1 to 7 in the following figure.
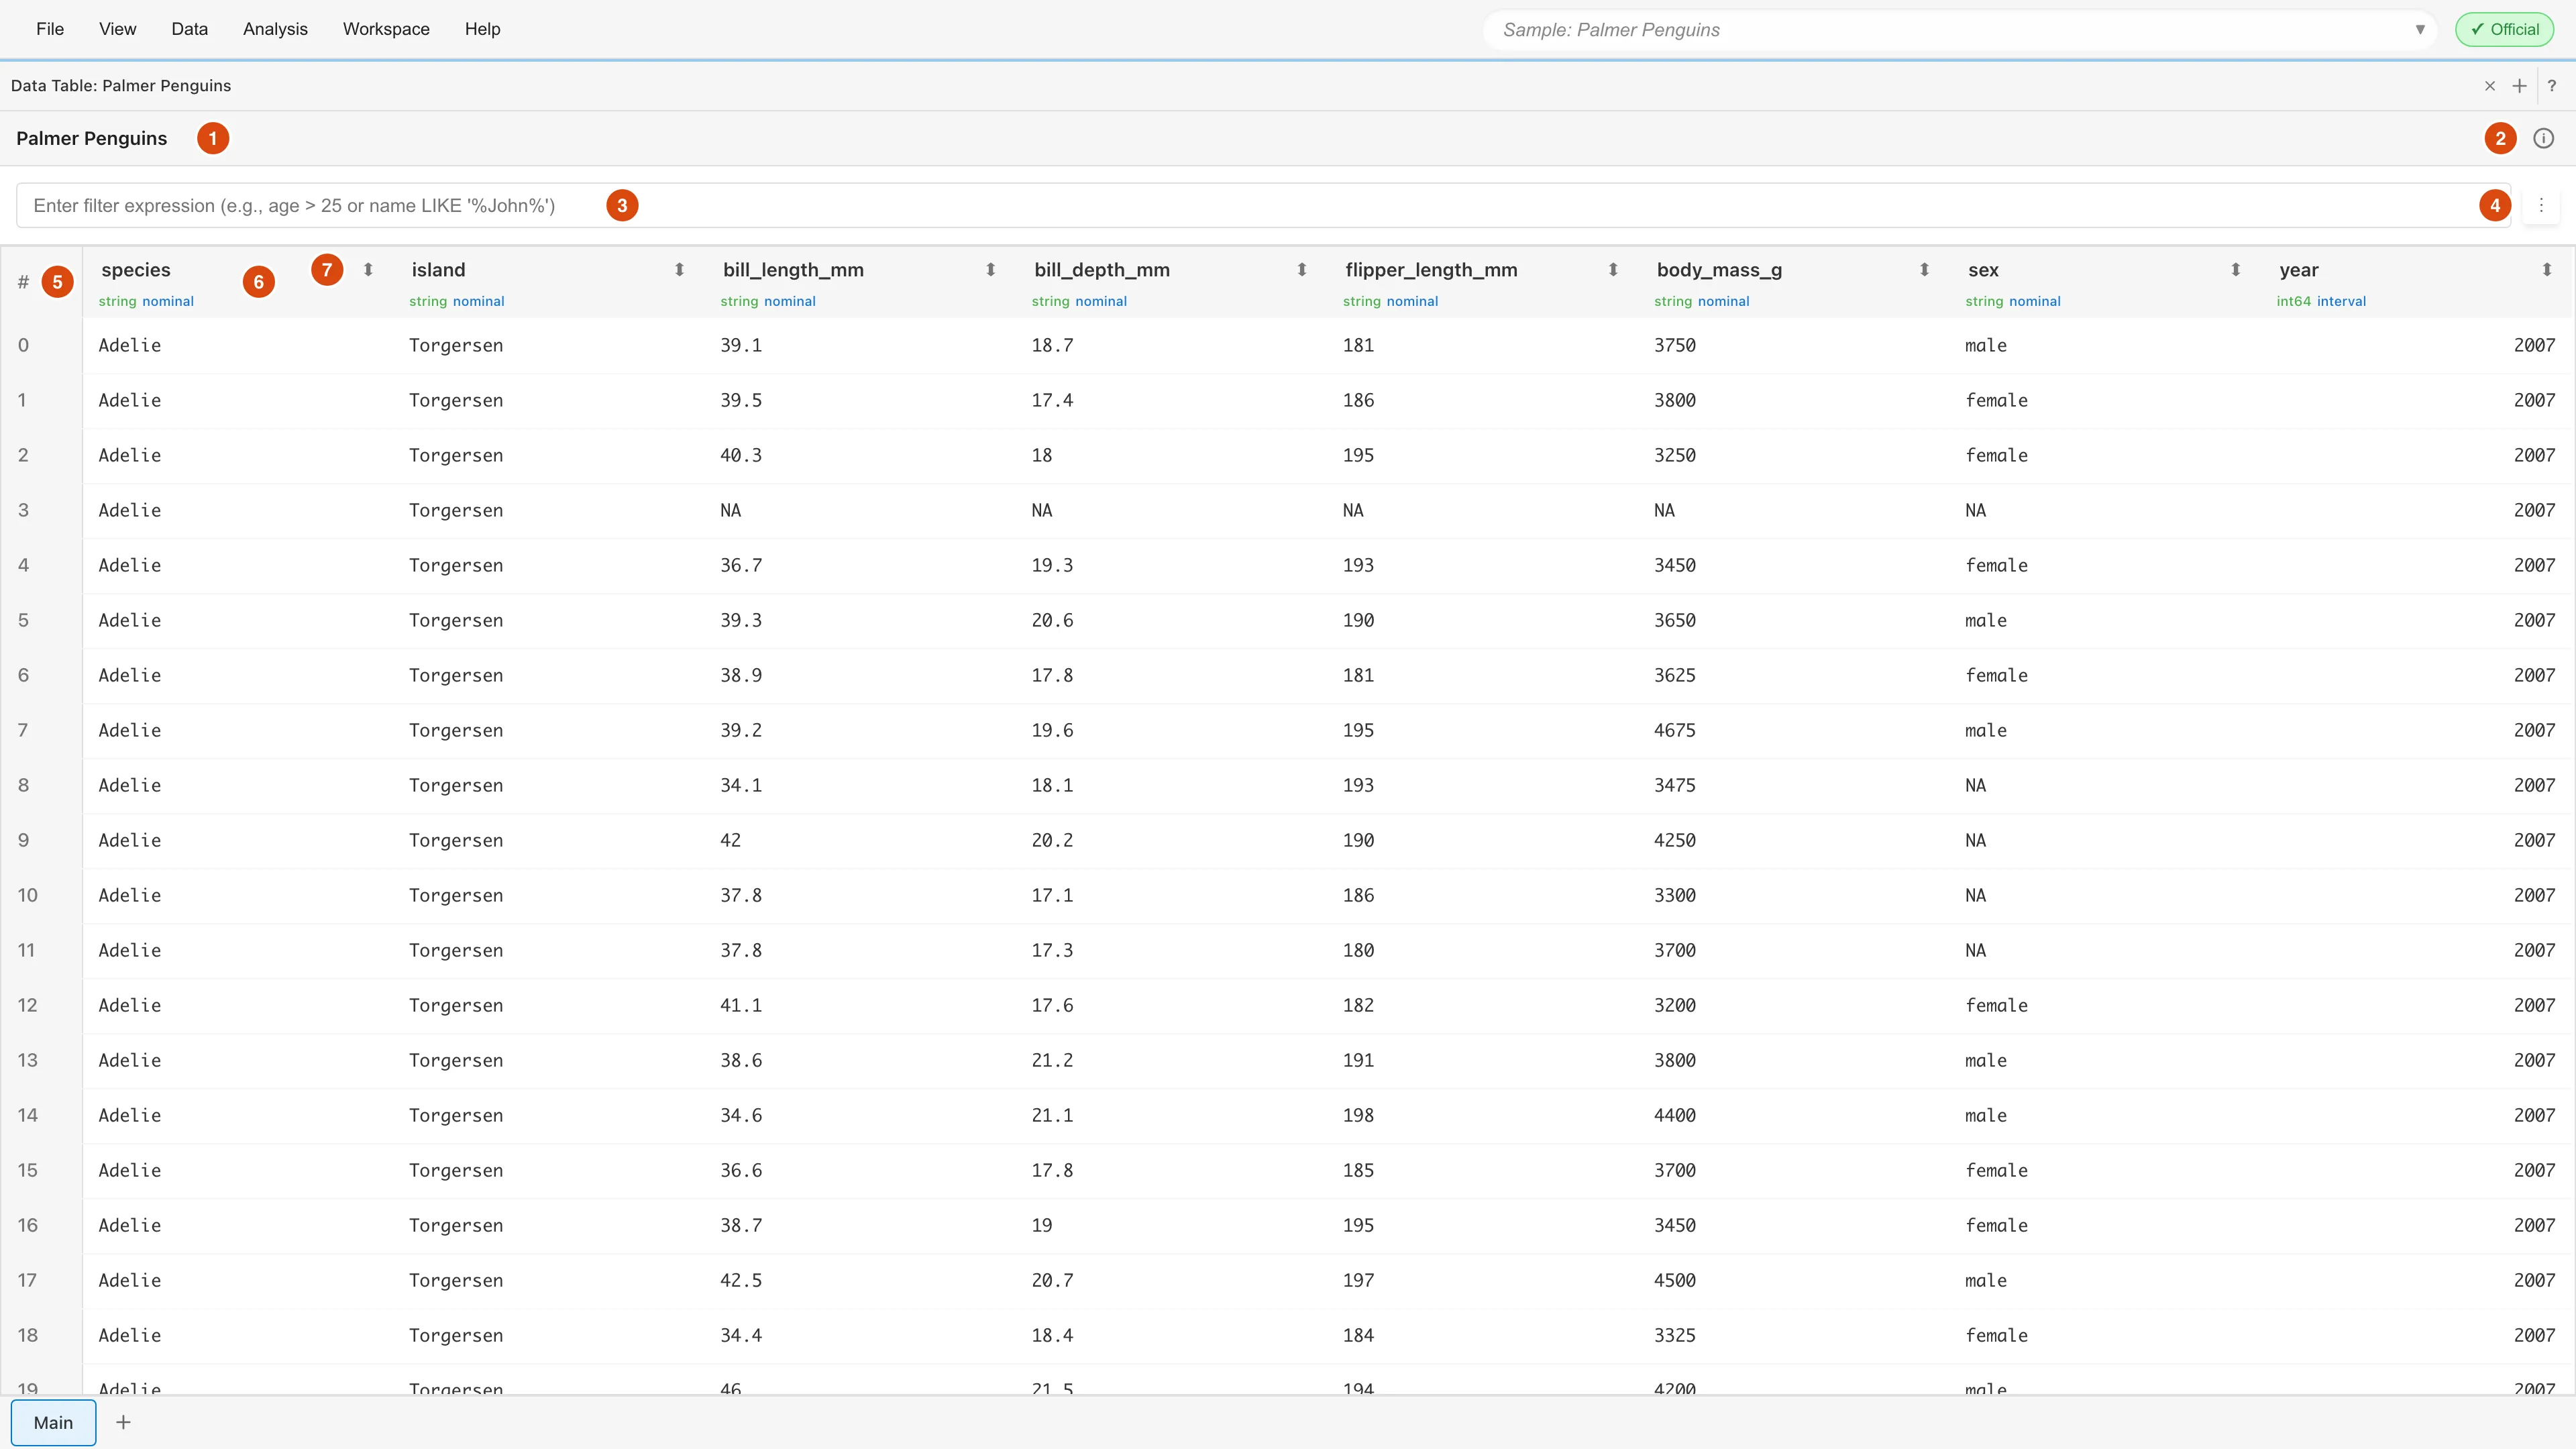
- Dataset name
- Info button that opens the Dataset Metadata dialog
- Filter input
- Button that opens the table menu
- Row number column
- Column header
- Sort button
The Dataset Metadata Dialog
The Dataset Metadata dialog shows basic information about the displayed dataset, together with its source or the operation that created it. Open it with the info button at the right end of the dataset name.
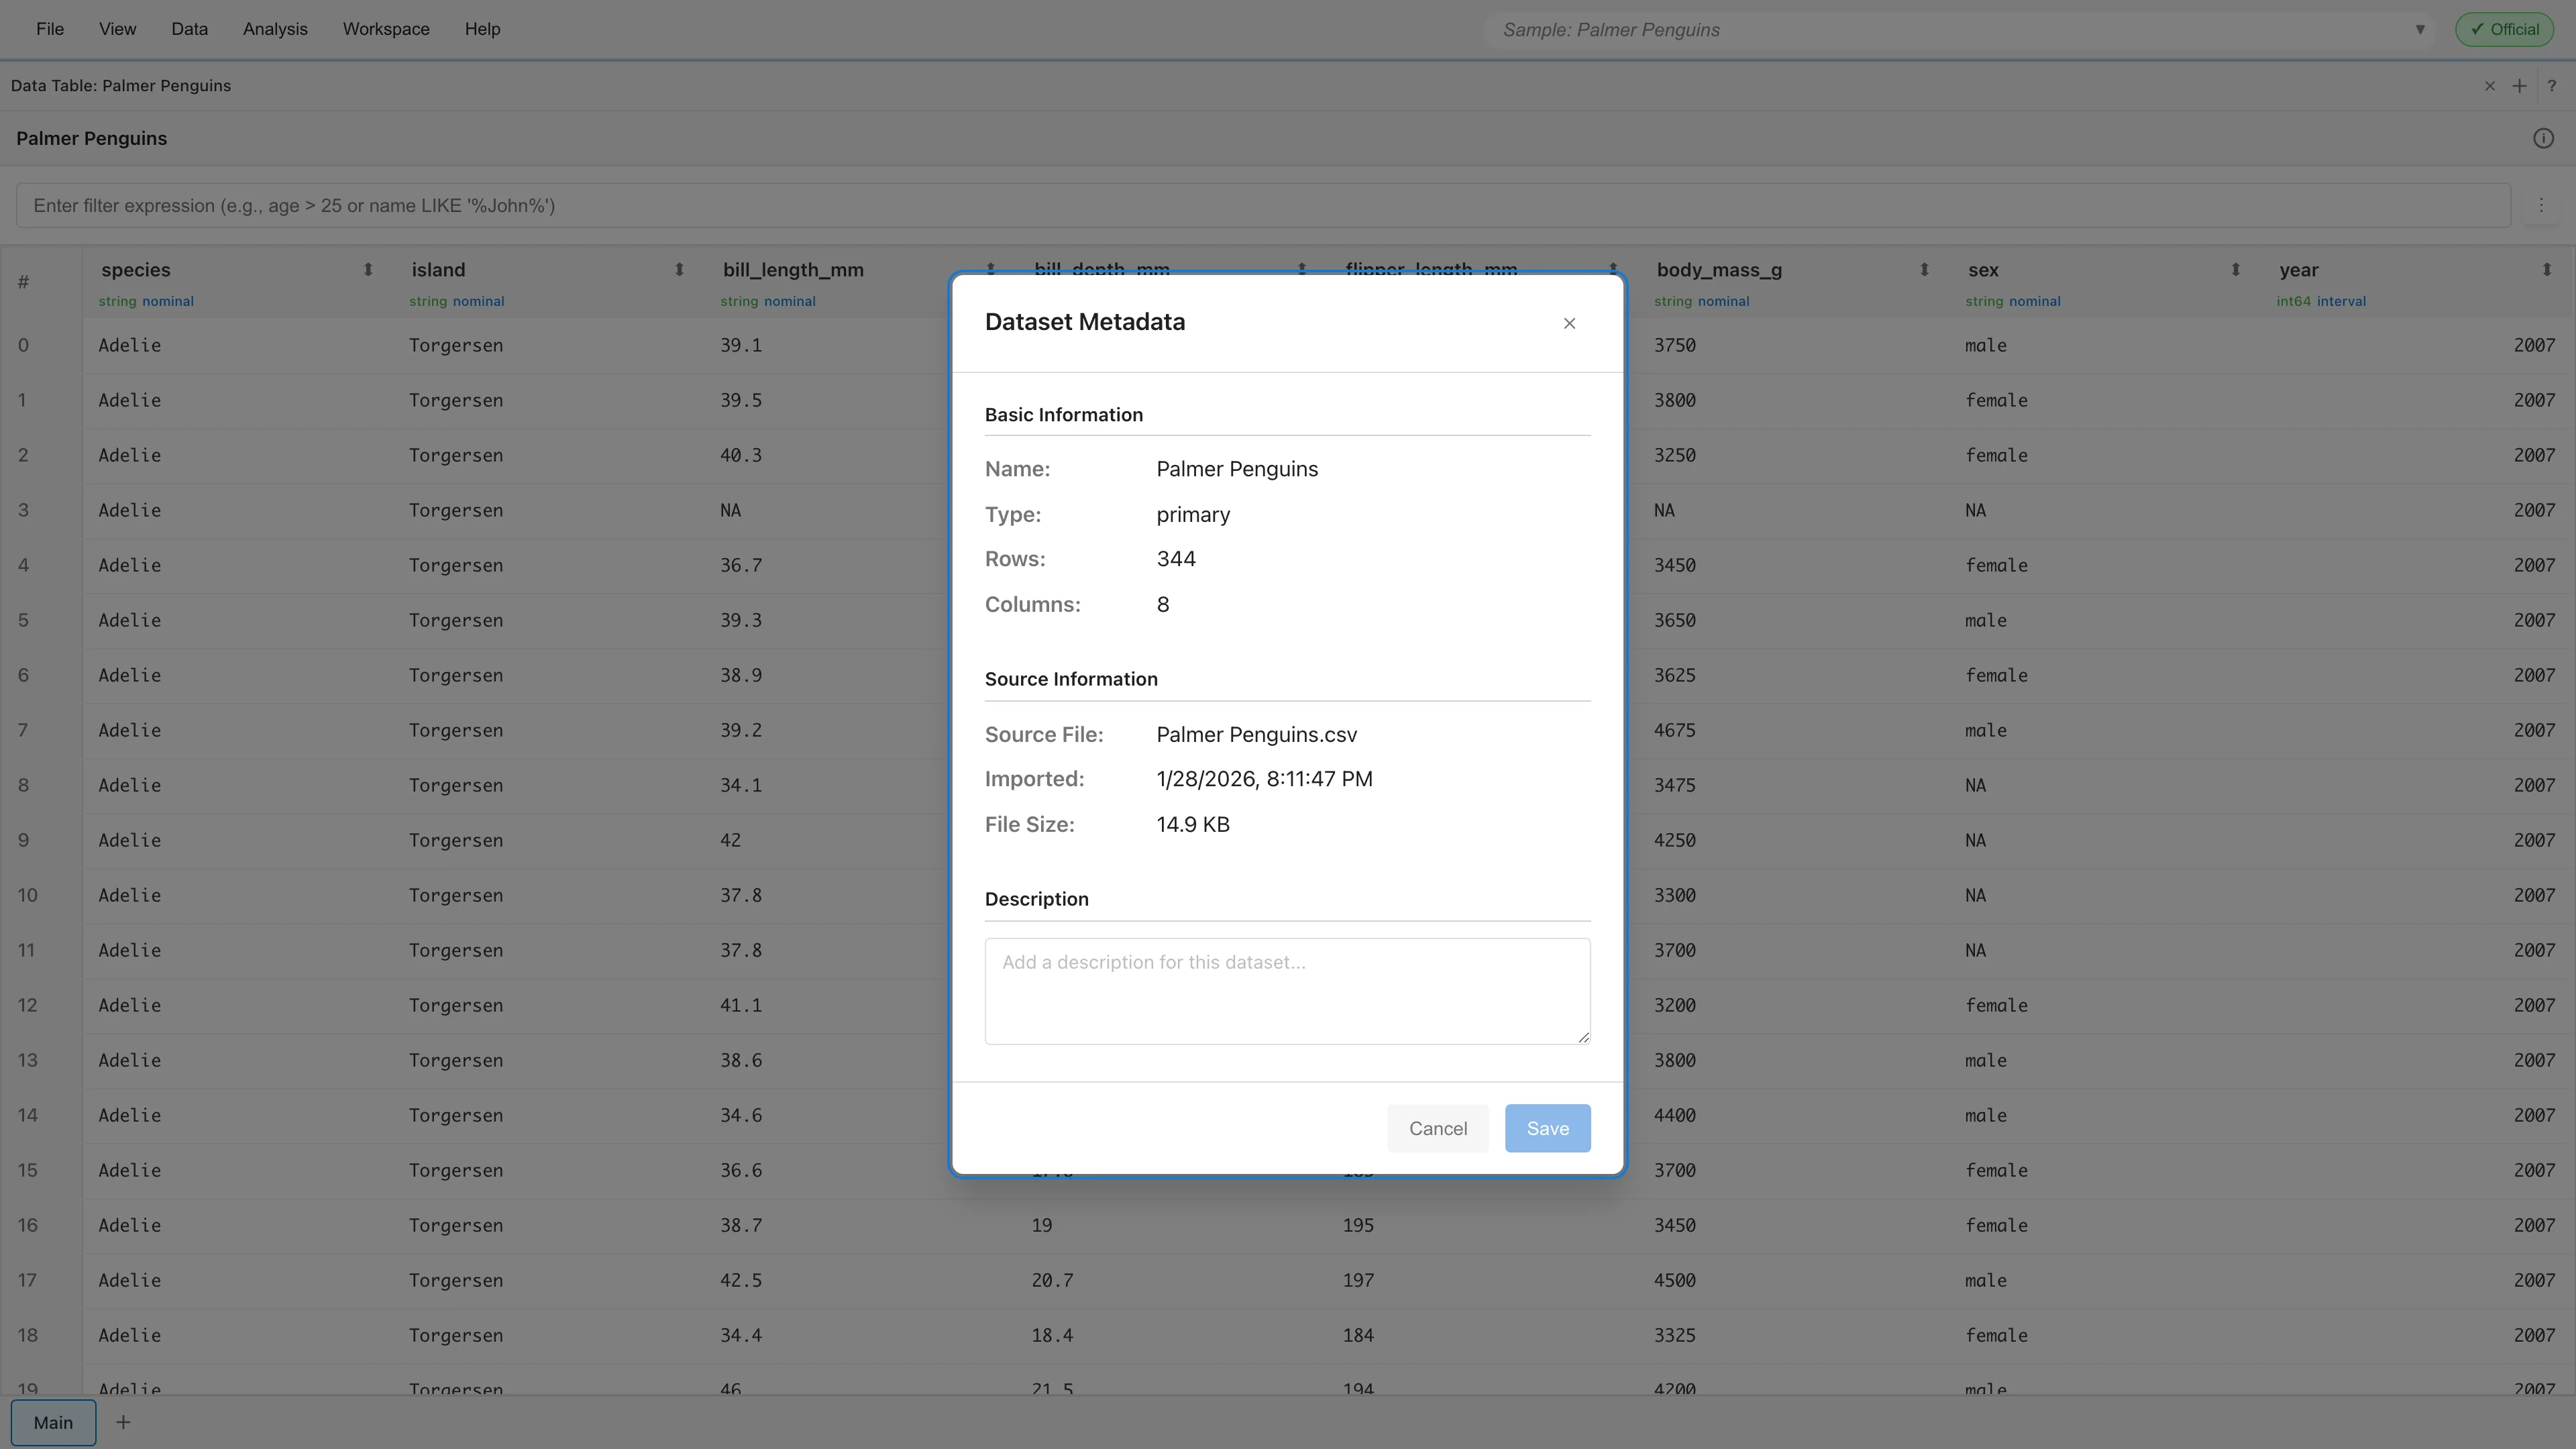
The dialog shows the following items.
| Section | Items | Datasets that show the items |
|---|---|---|
| Basic Information | Name, Type, Rows, Columns | All datasets |
| Source Information | Source File or Source URL, Imported, File Size | Primary Dataset |
| Derivation Information | Created, Operation | Derived dataset |
| Description | Description of the dataset | All datasets |
You can edit Description in this dialog. Write a description and click Save, and the description is saved to the dataset.
Reading the Table
Column Header
A column header shows the column name, the data type, and the measurement scale. When you hover over the measurement scale, the tooltip shows "(inferred)" for a scale that MIDAS inferred automatically and "(user-defined)" for a scale you set manually.
Use the column header for operations on a column. Click a column header to select the column, and right-click it to open the column settings menu. Use the button at the right end to sort. Drag the right border of a column header to change the column width.
Row Number
A row number identifies a row. The row numbers of the rows that remain in the table do not change when you filter, sort, or exclude rows. For the context menu of a row number cell, see Row Operations.
Cells
The appearance of a cell depends on its value. Numbers are right-aligned, and a cell with a missing value is left blank with a different background color. A value that does not fit the column width is shown with its end truncated, and hovering over the cell shows the whole value in a tooltip.
Filter
When you enter an expression in the filter input, only the rows that match the condition remain in the table. When filtering reduces the number of rows, MIDAS shows the row counts above the table as "Showing N of M rows (filtered)". The X button at the right end of the input clears the filter.
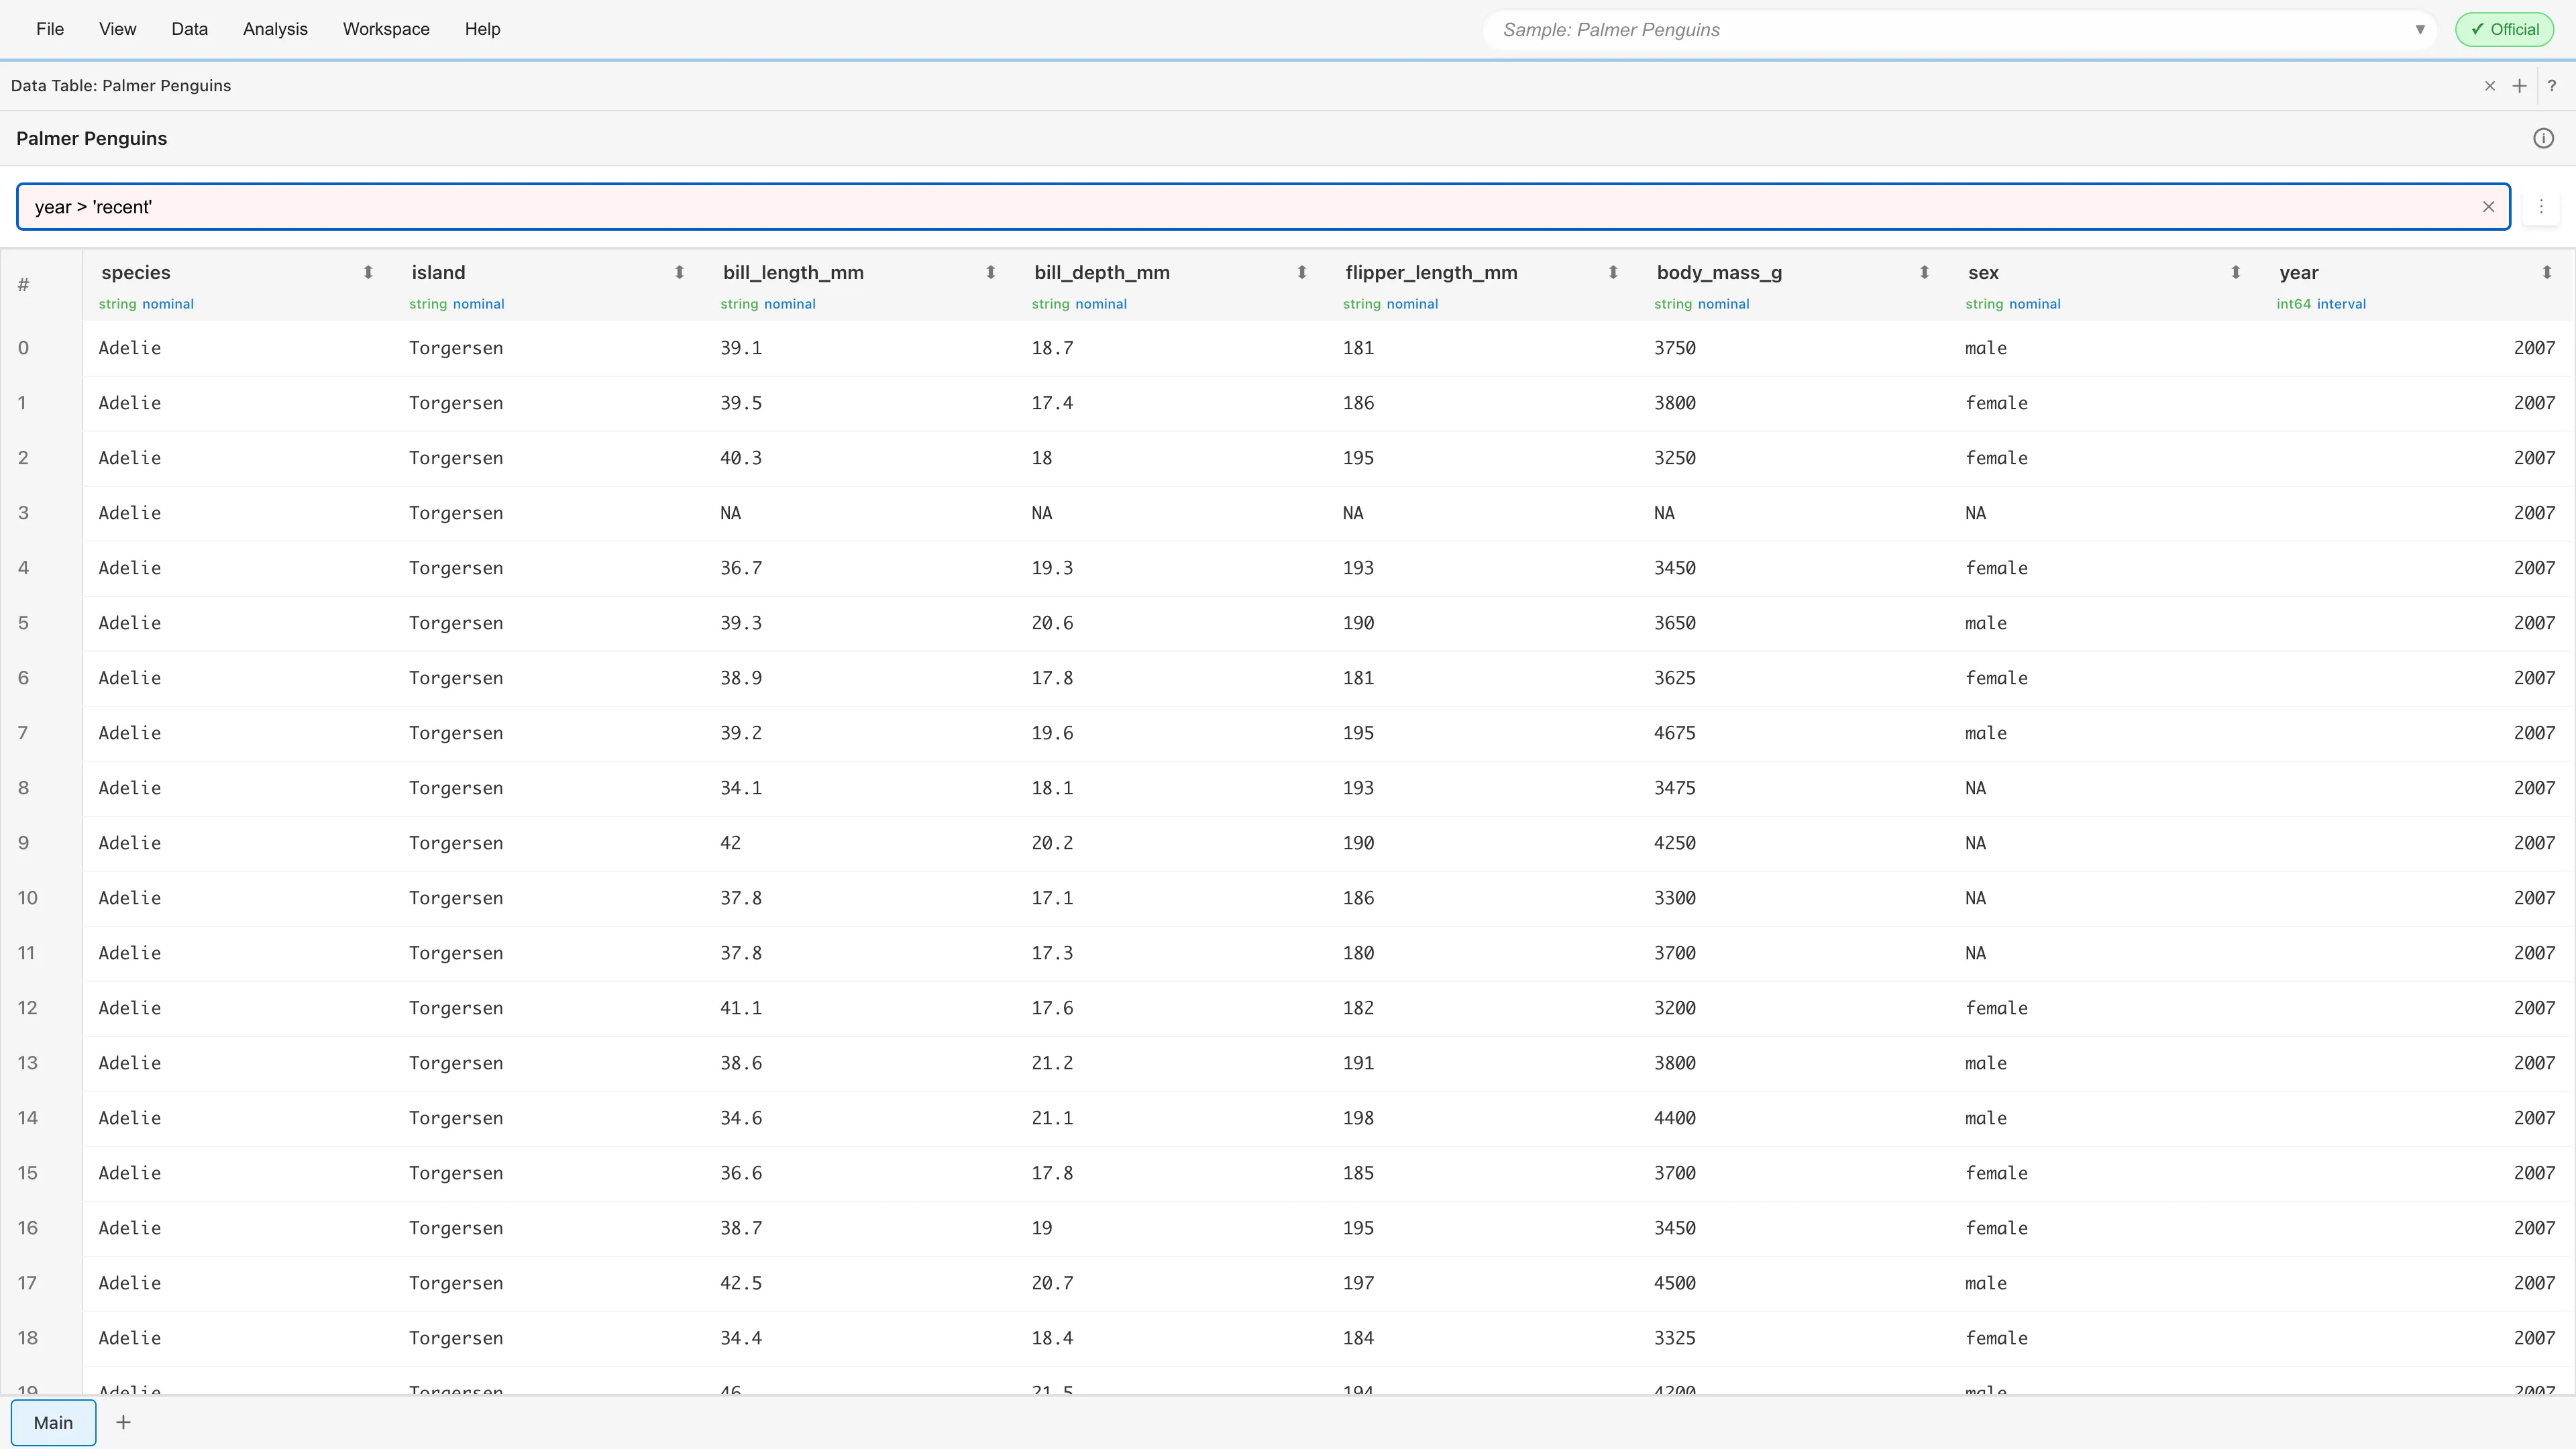
While the expression in the input is invalid, MIDAS does not filter by that expression and keeps the table filtered by the last valid expression. The input turns red. Hover over the input to see why the expression is invalid.
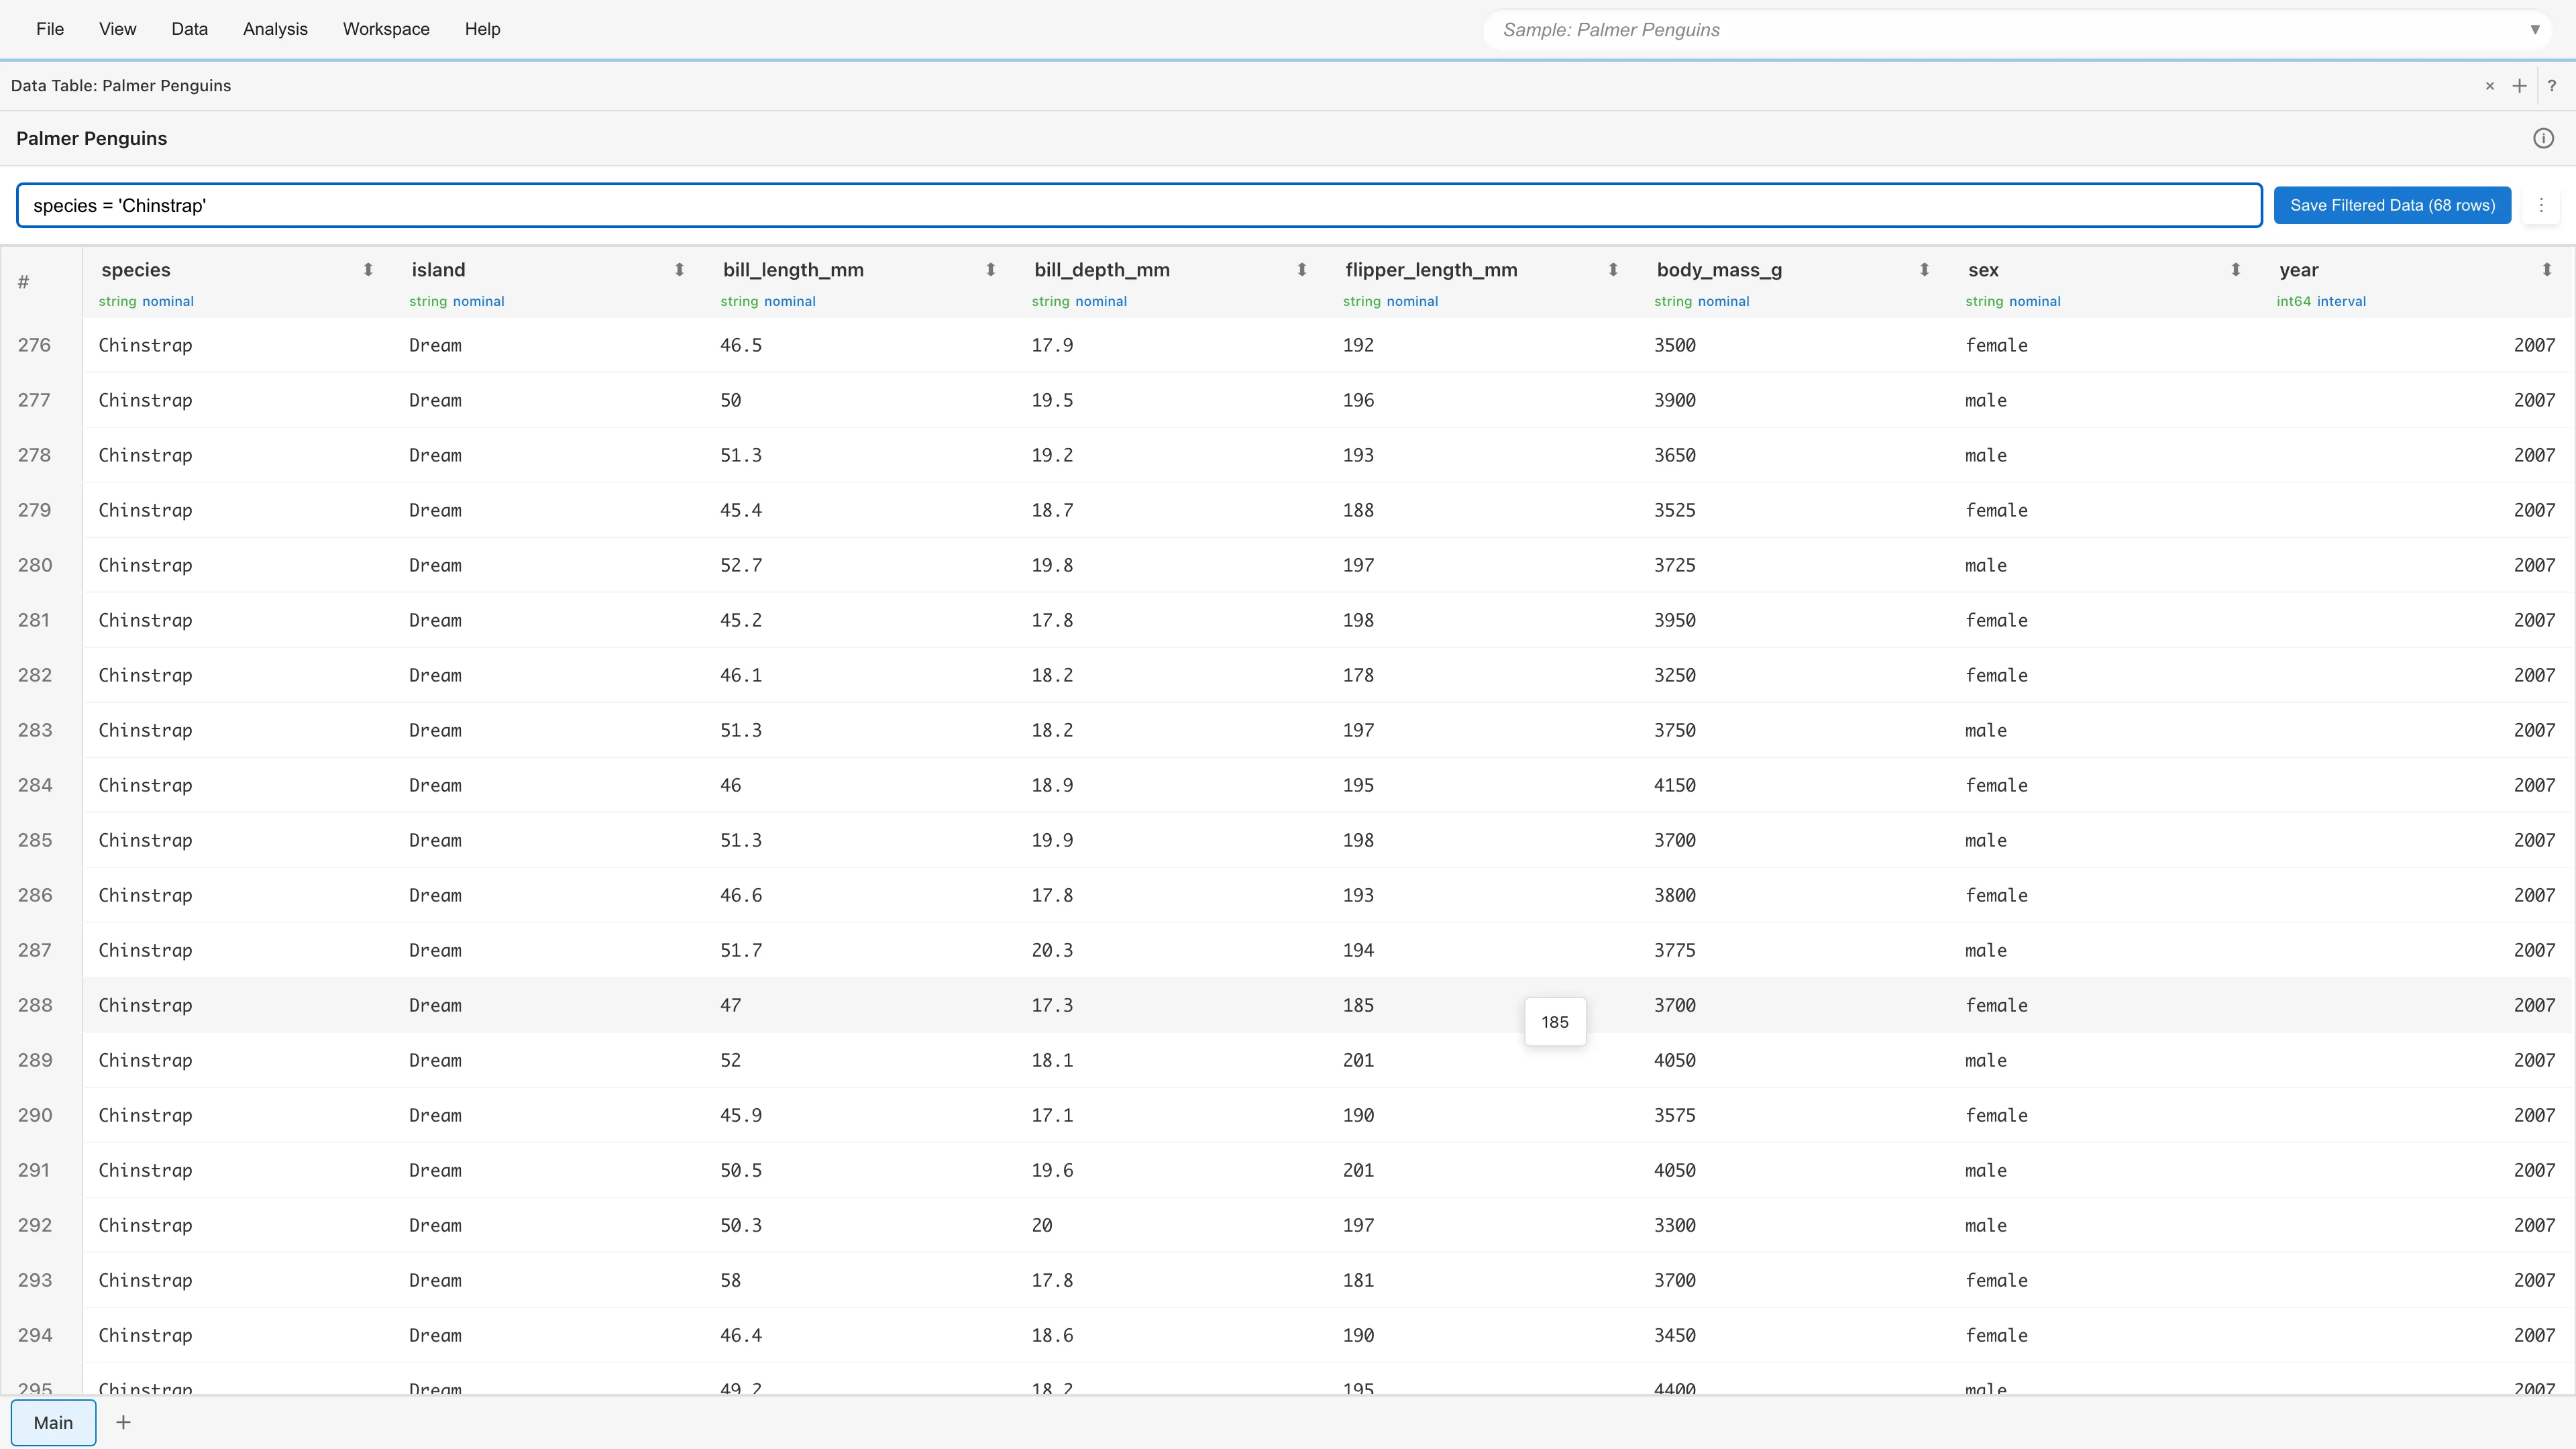
The filter also narrows the rows that the Statistics tab and the Selected Columns tab use. Both tabs use only the rows that match the filter of the Data Table tab they target. When the same dataset is open in several Data Table tabs, they do not use the filters of the tabs they do not target.
While a filter is active, the Save Filtered Data button appears to the right of the input. This button saves the filtered rows as a derived dataset and opens a Data Table tab for that dataset. The saved derived dataset holds a reference to the source dataset and the filter expression, not the rows themselves. When the source dataset is updated, MIDAS re-evaluates the condition against the updated values.
Writing Filter Expressions
A filter expression combines conditions on columns, such as year >= 2008, with AND, OR, NOT, and parentheses. Operators such as AND and LIKE can be written in uppercase or lowercase.
Column names are normally written without quotes. Enclose a column name in double quotes, as in "body mass", when it contains a character other than ASCII letters and digits, underscores, hiragana, katakana, and kanji, when it starts with a digit, or when it is the same as a reserved word of the filter expression such as and, like, or null. An expression that names a column the dataset does not have is invalid.
Write values in the following forms, depending on the data type. Enclose string and enum values in single quotes, as in 'Adelie'. To include a single quote in a value, write two single quotes, as in 'O''Brien'. Write int64 and float64 values without quotes, as in 2008, -1.5, and 1e3. Write boolean values as true or false without quotes. Write date and datetime values in the form '2024-01-31' or '2024/01/31'. To add a time, write the form '2024-01-31T09:00:00'. Add a time zone at the end, as in '2024-01-31T09:00:00+09:00'.
The following conditions are available.
| Condition | Example | Meaning |
|---|---|---|
= != > < >= <= | year >= 2008 | Comparison of values |
LIKE / ILIKE / NOT LIKE / NOT ILIKE | species LIKE 'Ade%' | Pattern matching |
IS NULL / IS NOT NULL | sex IS NULL | Test for missing values |
IN / NOT IN | island IN ('Biscoe', 'Dream') | Match against any of the candidates |
BETWEEN / NOT BETWEEN | year BETWEEN 2007 AND 2008 | Range test that includes both ends |
NOT (condition) | NOT (sex = 'male' AND year = 2007) | Negation of a condition |
In a LIKE pattern, % matches any string of zero or more characters, and _ matches any single character. To match % or _ as the character itself, put a backslash before it. ILIKE matches without distinguishing uppercase from lowercase. LIKE and ILIKE can be used only on string and enum columns. Write the pattern as a string, as in 'Ade%'. An expression with a pattern that is not a string, such as species LIKE 5, is invalid.
MIDAS converts a value written in the expression to the data type of the column before comparing it with the column values. For example, year = '2007' on the int64 column year is a comparison with the number 2007 and gives the same result as year = 2007. An expression with a value that cannot be converted to the data type of the column, such as year > 'recent', is invalid. To compare a string column as numbers, convert its data type first in the Convert Column Types tab.
MIDAS compares date and datetime values in UTC. A time written without a time zone is treated as a UTC time. When a value of a date column is compared with a value that has a time, the date value is treated as 00:00 UTC of that day.
MIDAS compares string and enum values in the order of their character codes (UTF-16 code units), so uppercase letters come before lowercase letters. Enum values are also compared as strings, not in the order of the enum definition used for sorting. For boolean values, false is smaller than true.
A missing value is not equal to any value, has no order relative to other values, and matches no pattern. Therefore a row whose value in the compared column is missing does not match any of the conditions =, >, <, >=, <=, LIKE, ILIKE, IN, and BETWEEN.
A negated condition matches every row that does not match the condition before negation2. !=, NOT IN, NOT BETWEEN, NOT LIKE, and NOT ILIKE all match rows with a missing value, because the condition before negation does not match those rows. NOT (condition) matches every row that does not match the condition in the parentheses. For example, species != 'Adelie' also matches the rows where species is missing. To remove rows with a missing value from a negated condition, add AND species IS NOT NULL.
The only conditions that test whether a value is missing are IS NULL and IS NOT NULL. NULL cannot be written as a value. An expression that writes NULL as a value, such as sex = NULL or sex IN ('male', NULL), is invalid.
When the data type of a column of the displayed dataset changes later, or a column disappears, MIDAS continues to evaluate the filter expression applied to the tab against the changed dataset. The data type of a column and the set of columns change, for example, when you change the settings of the operation that created a derived dataset. Unlike an invalid expression being entered, MIDAS does not clear the applied expression even when the change makes the expression invalid. This happens when a referenced column disappears, when a value written in the expression can no longer be converted to the new data type, or when a column used with LIKE changes to a data type other than string and enum. In this case the input shows an error, and MIDAS evaluates the condition that became invalid as a condition that matches no row. The rule for negated conditions still applies, so the negation of a condition that became invalid matches every row.
Sort
Click the button at the right end of a column header to sort the rows in ascending order of that column. Click it again to sort in descending order, and click it a third time to return to the original order.
When you click while holding Ctrl/Cmd, MIDAS adds the column to the sort conditions and shows a priority number on the button.
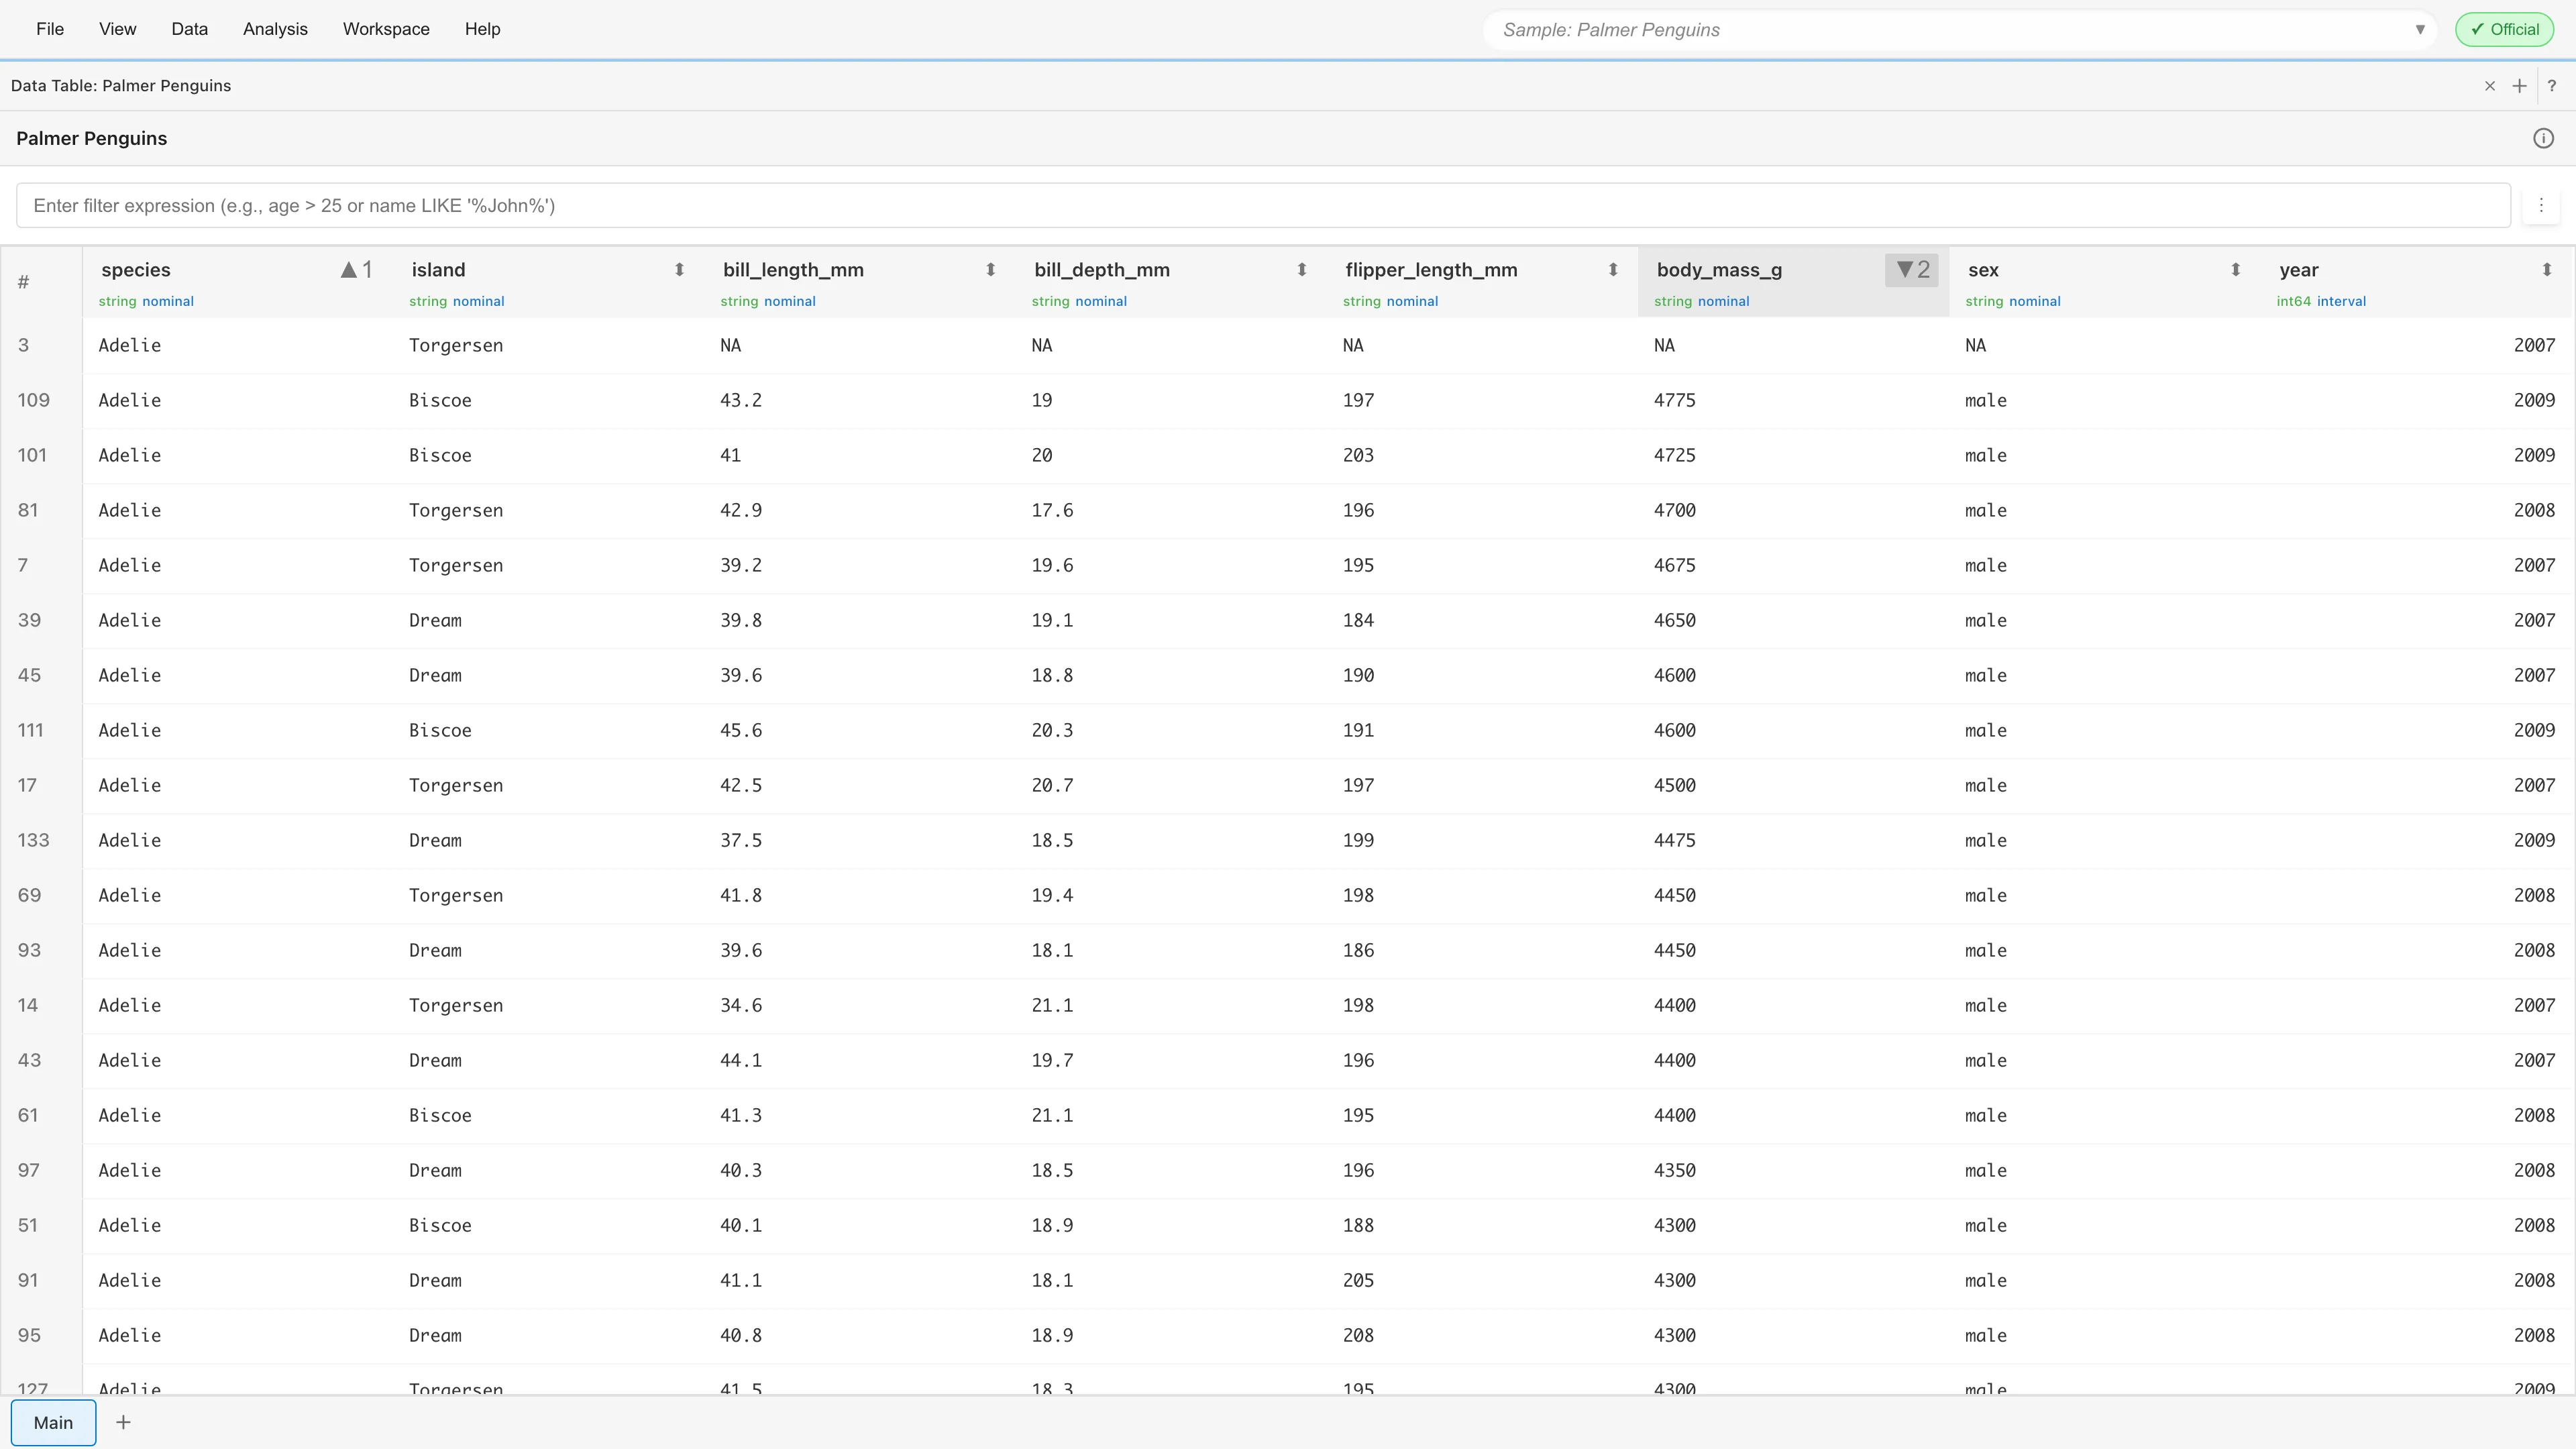
There are two exceptions to ordering by the magnitude of values. Missing values are placed last in both ascending and descending order. An enum column is ordered by the order of the enum definition, not by its values, regardless of its measurement scale.
Sorting changes only the display order. The row numbers and the row selection do not change.
Selecting Rows and Columns
Clicking a row clears the previous selection and selects only that row. Clicking while holding Ctrl/Cmd keeps the previous selection and adds the row to it. Clicking a selected row while holding Ctrl/Cmd deselects only that row. Clicking while holding Shift adds to the selection the range from the row you last clicked without Shift to the clicked row. When exactly one row is selected, clicking that row clears the selection. The row selection is linked with the Statistics tab and Graph Builder. For how the linking works, see How Row Selection Works.
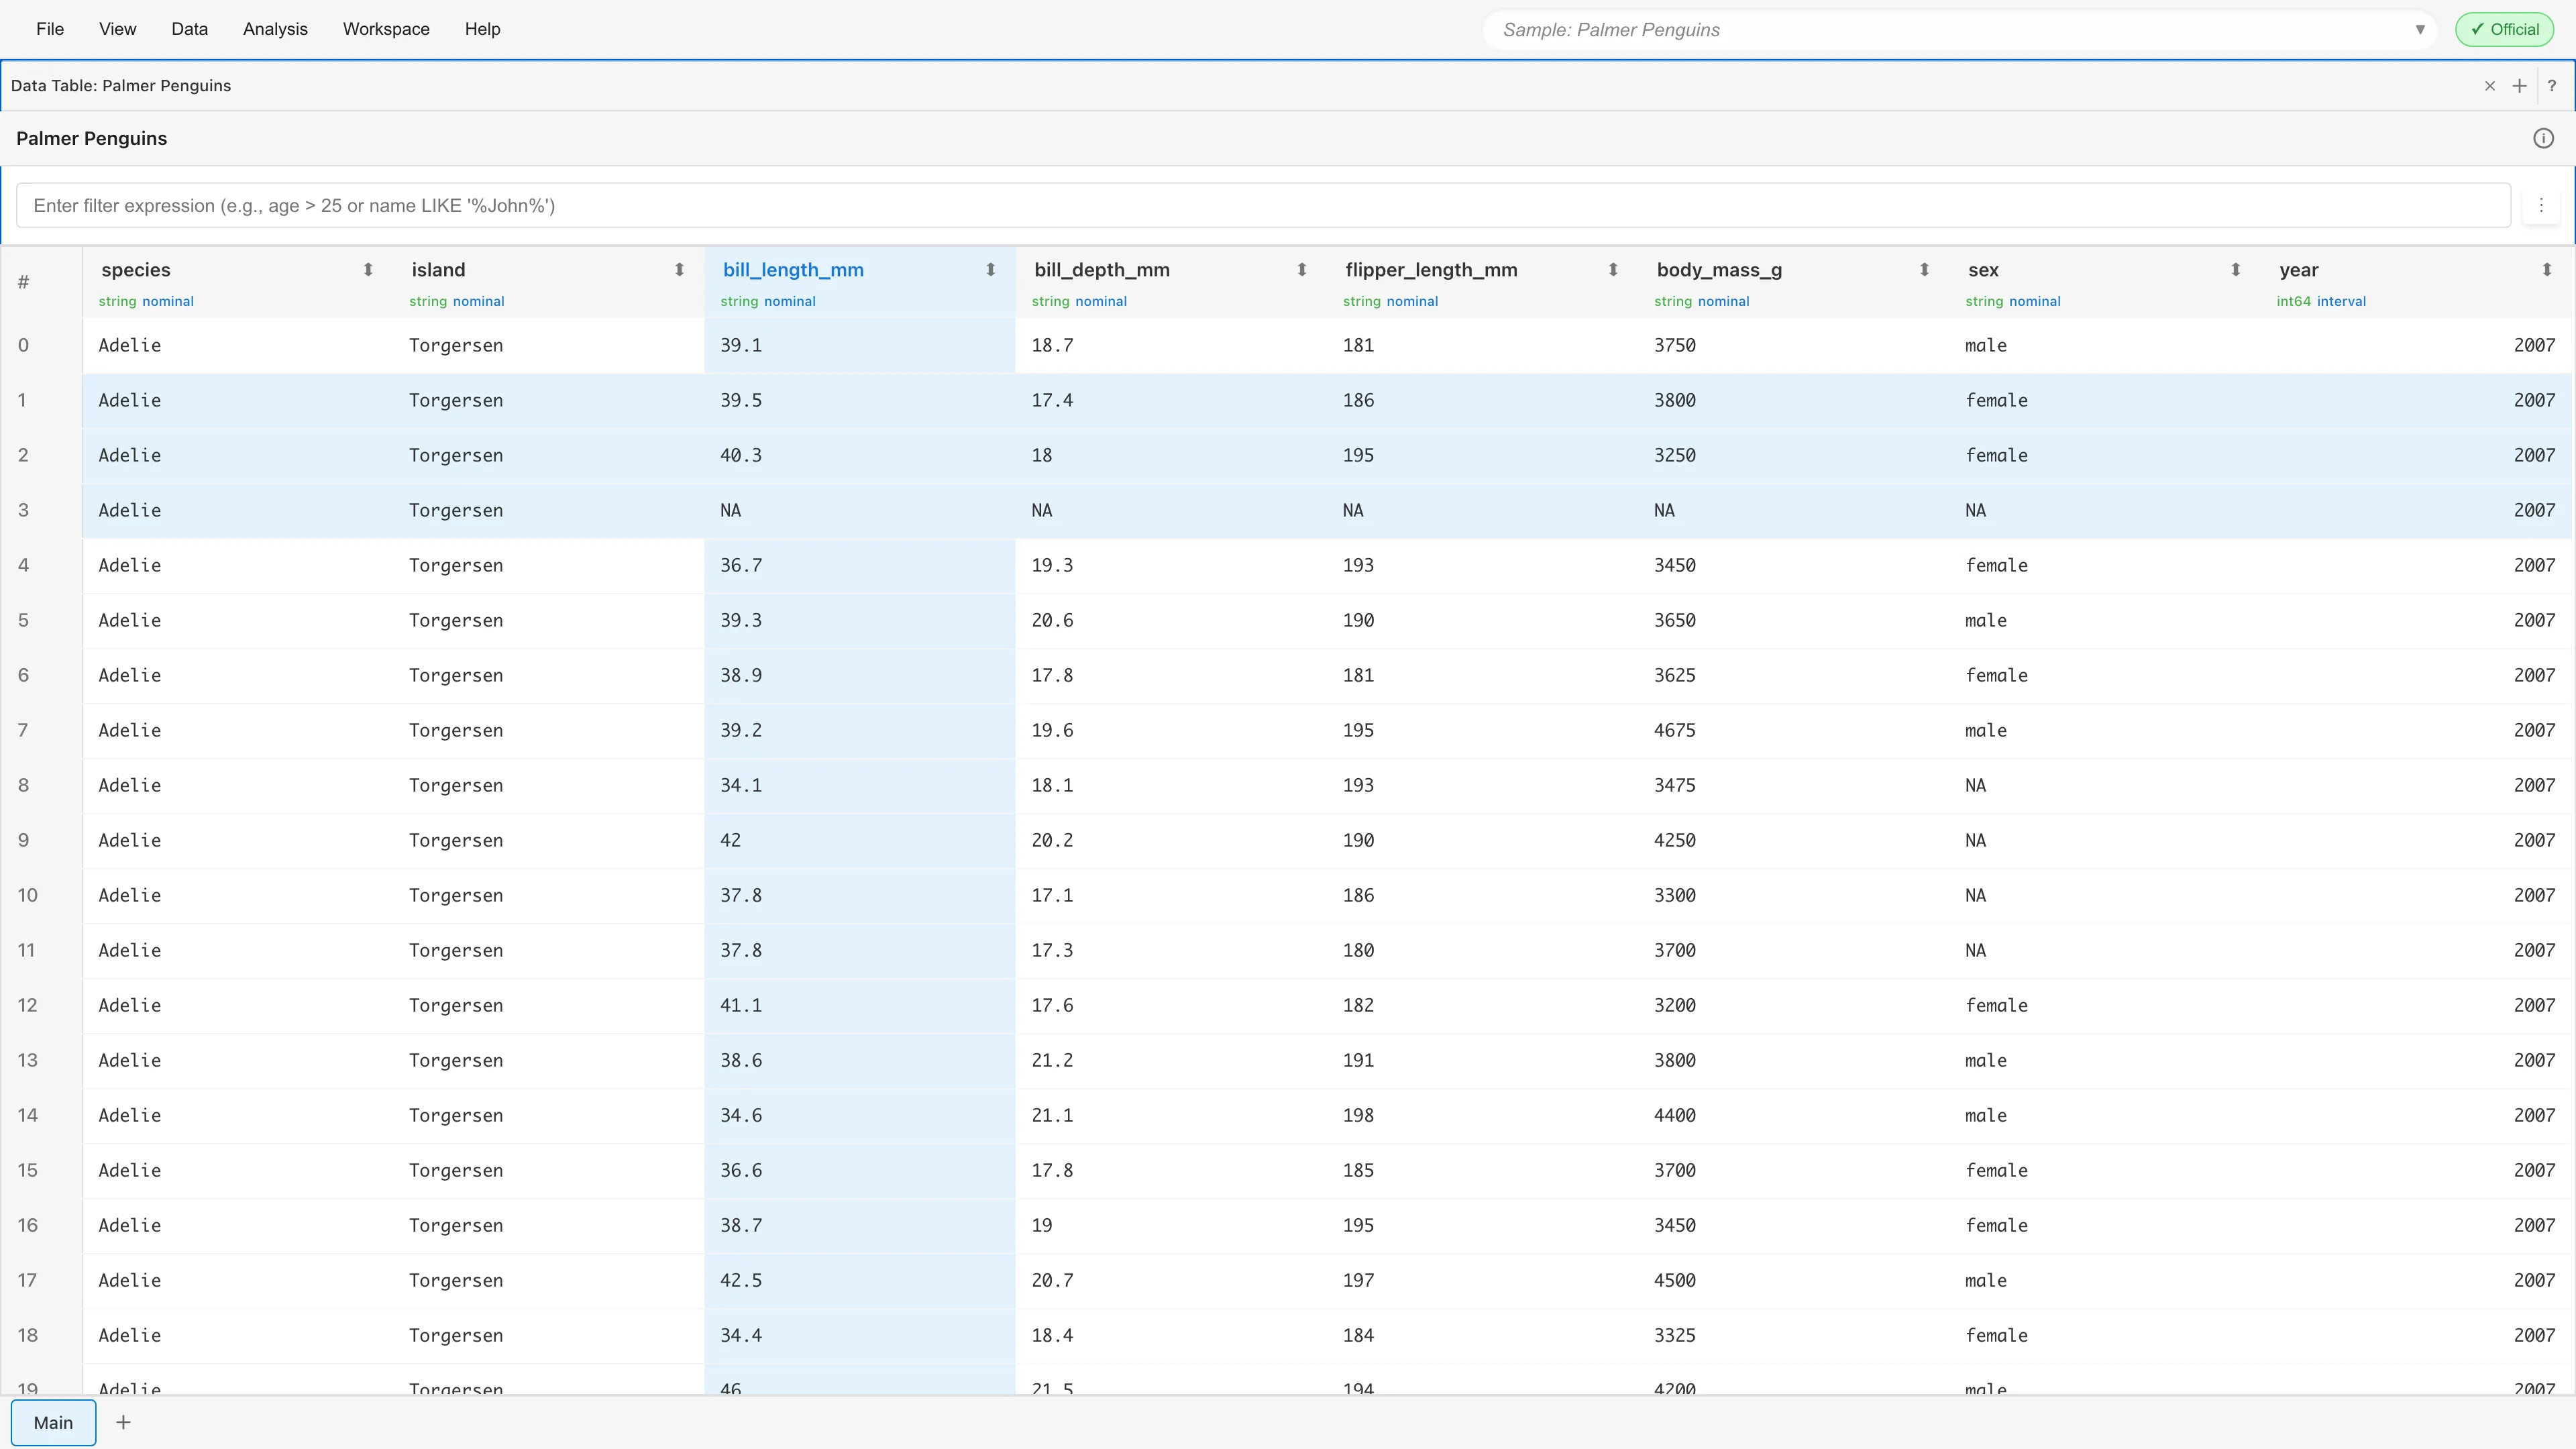
Clicking a column header clears the previous column selection and selects only that column. Clicking while holding Ctrl/Cmd keeps the previous selection and adds the column to it. When exactly one column is selected, clicking its column header clears the selection. The Selected Columns tab shows the selected columns.
Column Settings
Right-clicking a column header opens a menu of operations on that column.
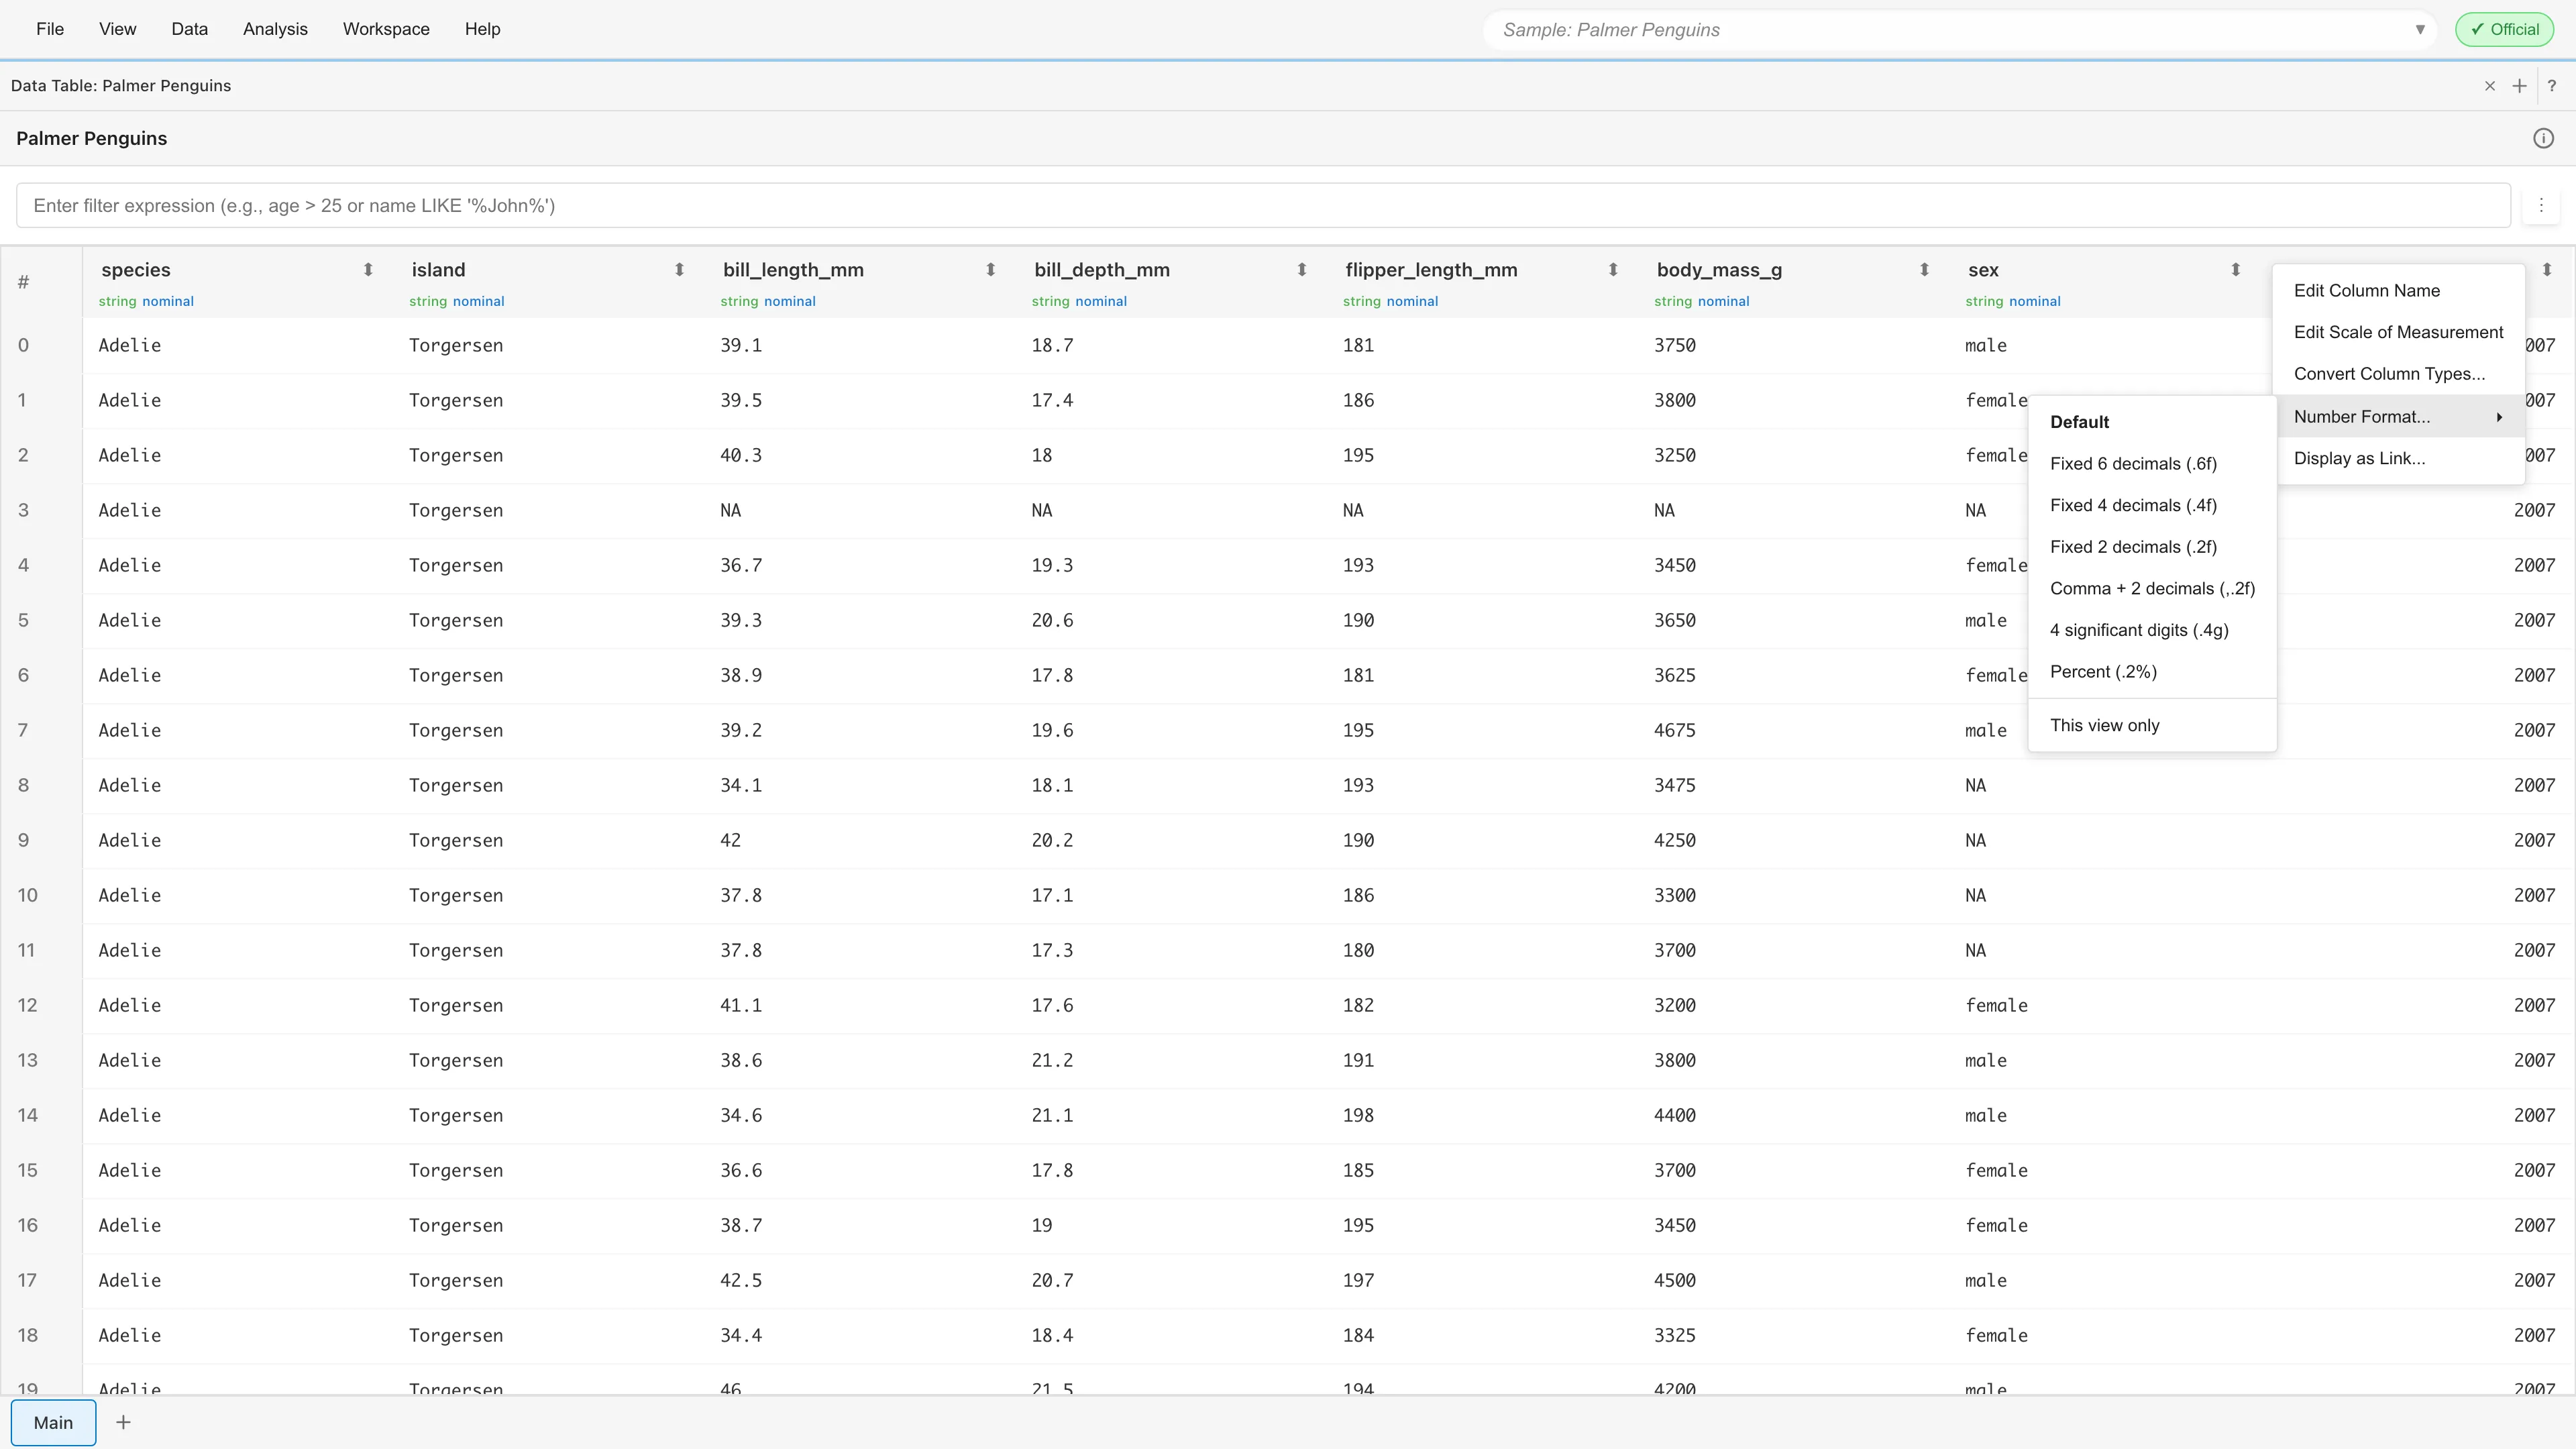
Edit Column Name makes the column name editable. Double-clicking a column name does the same. A new column name cannot start with __midas_ and cannot be Row #. Names that start with __midas_ are names of columns MIDAS creates internally, and Row # is the name of the row number column. The column names of a derived dataset cannot be changed, because they are determined by the SQL or the conversion settings that created the dataset. In a derived dataset, Edit Column Name is disabled. Hover over the item to see why it is disabled.
Edit Scale of Measurement opens a dialog for choosing the measurement scale of the column. Choose the measurement scale from nominal, ordinal, interval, and ratio. For string and enum columns, only nominal and ordinal are available. For the meaning of each scale, see Data Types and Measurement Scales.
Convert Column Types... opens the Convert Column Types tab, which converts the data types of columns.
Normalize Variants... opens the Normalize Variants tab. In that tab, you unify values written in varying ways into a single form. This item appears only in the menu of string and enum columns.
The remaining two items of the menu set the number format and the link display. The number format and the link display are together called the display format. The number format and the link display are independent settings, and a column can have both. A column with both displays the formatted value as a link. A display format can be set on the dataset or on a Data Table tab. A format set on the dataset takes effect everywhere the dataset is displayed, and a format set on a tab takes effect only in that tab. Whether the setting on the dataset or on the tab takes effect is decided separately for the number format and for the link display. When a column has the same kind of setting both on the dataset and on a tab, the setting on the tab takes effect in that tab. A column with a link display on the dataset and a number format on a tab has both in effect in that tab.
Number Format... opens a submenu that lists number format presets. This item appears only in the menu of int64 and float64 columns. The presets and how each one displays values are as follows.
| Preset | Display |
|---|---|
| Default | The default format set in Number Format in Settings |
| Fixed 6 decimals (.6f) | 6 decimal places |
| Fixed 4 decimals (.4f) | 4 decimal places |
| Fixed 2 decimals (.2f) | 2 decimal places |
| Comma + 2 decimals (,.2f) | Thousands separators and 2 decimal places |
| 4 significant digits (.4g) | 4 significant digits |
| Percent (.2%) | The value multiplied by 100, with 2 decimal places and a % sign |
Choosing Default removes the number format and leaves the link display as it is. When you turn on This view only in the submenu and then choose a preset, the format is set on the Data Table tab where you opened the menu, not on the dataset. In that case, Default removes the number format on the tab, and the number format on the dataset remains.
Display as Link... opens a dialog for the setting that displays cell values as links. Write the URL of the link destination in URL template. A {column name} written in the URL is replaced, for each row, with the value of that column in the same row. In Apply to, choose whether to set the link display on the dataset or on the Data Table tab. For a column that already has a link display, the item name changes to Edit Link Display.... You can remove the link display with Remove in the dialog. Remove does not remove the number format.
When the provenance of the project includes a signer that is not trusted, MIDAS does not display cell values as links. In this case, a Data Table tab that has a column with a link display shows a warning above the table that explains why links are disabled. For how to register a signer as trusted, see Managing Signing Keys.
Row Operations
Row number cells and data cells each have their own context menu. The menu of a row number cell applies to the row you right-clicked. However, when the row you right-clicked is selected, the menu applies to all selected rows.
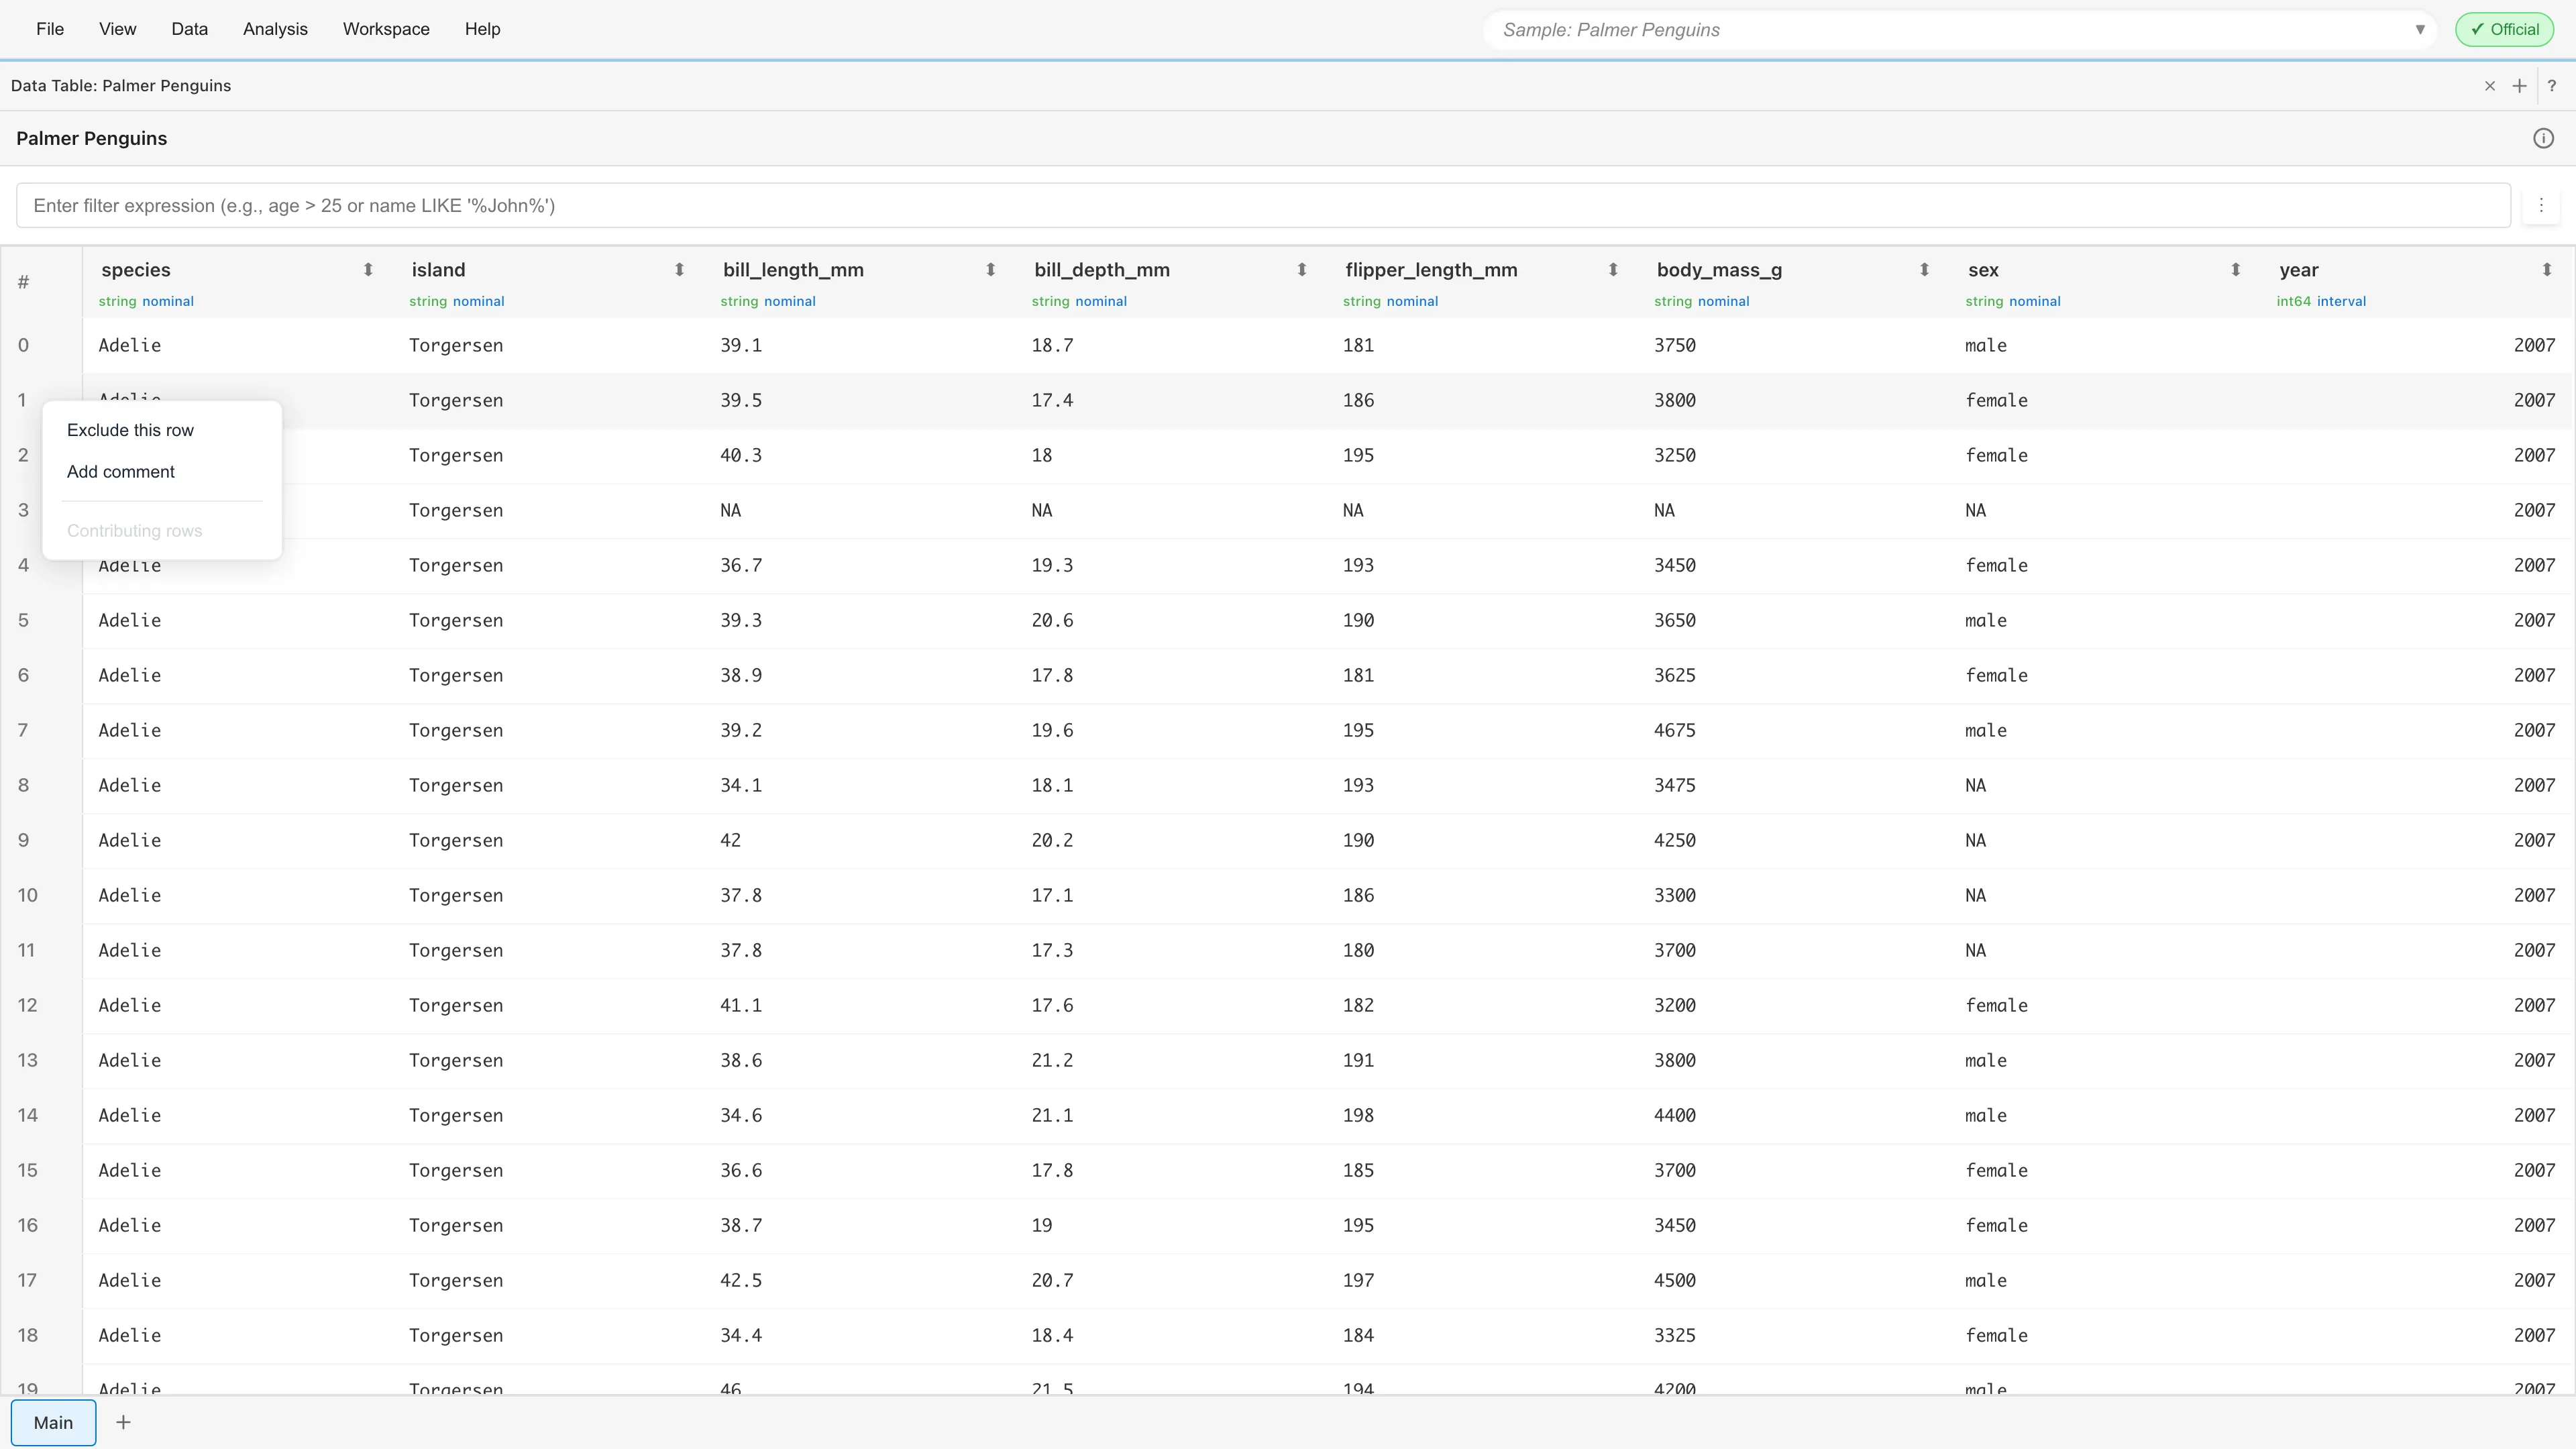
Exclude this row excludes rows of a Primary Dataset. For the steps to exclude and restore rows, see Excluding and Restoring Rows.
Add comment adds a comment to rows of a Primary Dataset. A row with a comment has a mark next to its row number. Hover over the mark to see the comment. You can rewrite the comment with Edit comment.
Contributing rows opens, in a Contributing rows tab, the rows of the source dataset that were used to create the target rows. When the source dataset was itself created from another dataset, you can choose in the submenu which dataset to trace back to. This item is disabled for a Primary Dataset and for a derived dataset created by an operation whose original rows cannot be traced. Hover over the item to see why it is disabled. For details of the Contributing rows tab, see the Filtered Data tab.
The menu of a data cell has Copy Cell Value and Contributing rows. Copy Cell Value copies the text displayed in the cell to the clipboard. Contributing rows behaves the same as the item with the same name in the menu of a row number cell.
Excluding and Restoring Rows
Excluding rows removes rows from a Primary Dataset and keeps them so that you can restore them later. Excluded rows are also absent from the derived datasets created from that dataset. The row numbers of the remaining rows do not change.
Choosing Exclude this row opens a confirmation dialog that shows the contents of the rows to exclude. You can write the reason for the exclusion in the dialog. When you click Exclude Row for one row, or Exclude Rows for several rows, MIDAS removes the target rows from the dataset.
The Data Table tab of a Primary Dataset that has excluded rows shows the number of excluded rows above the table, as in "3 rows are excluded from this dataset." The View excluded rows button next to it opens the Excluded Rows dialog. The dialog lists the excluded rows and shows, for each row, the row number, the values of the first three columns, the reason for the exclusion, and the date and time of the exclusion.
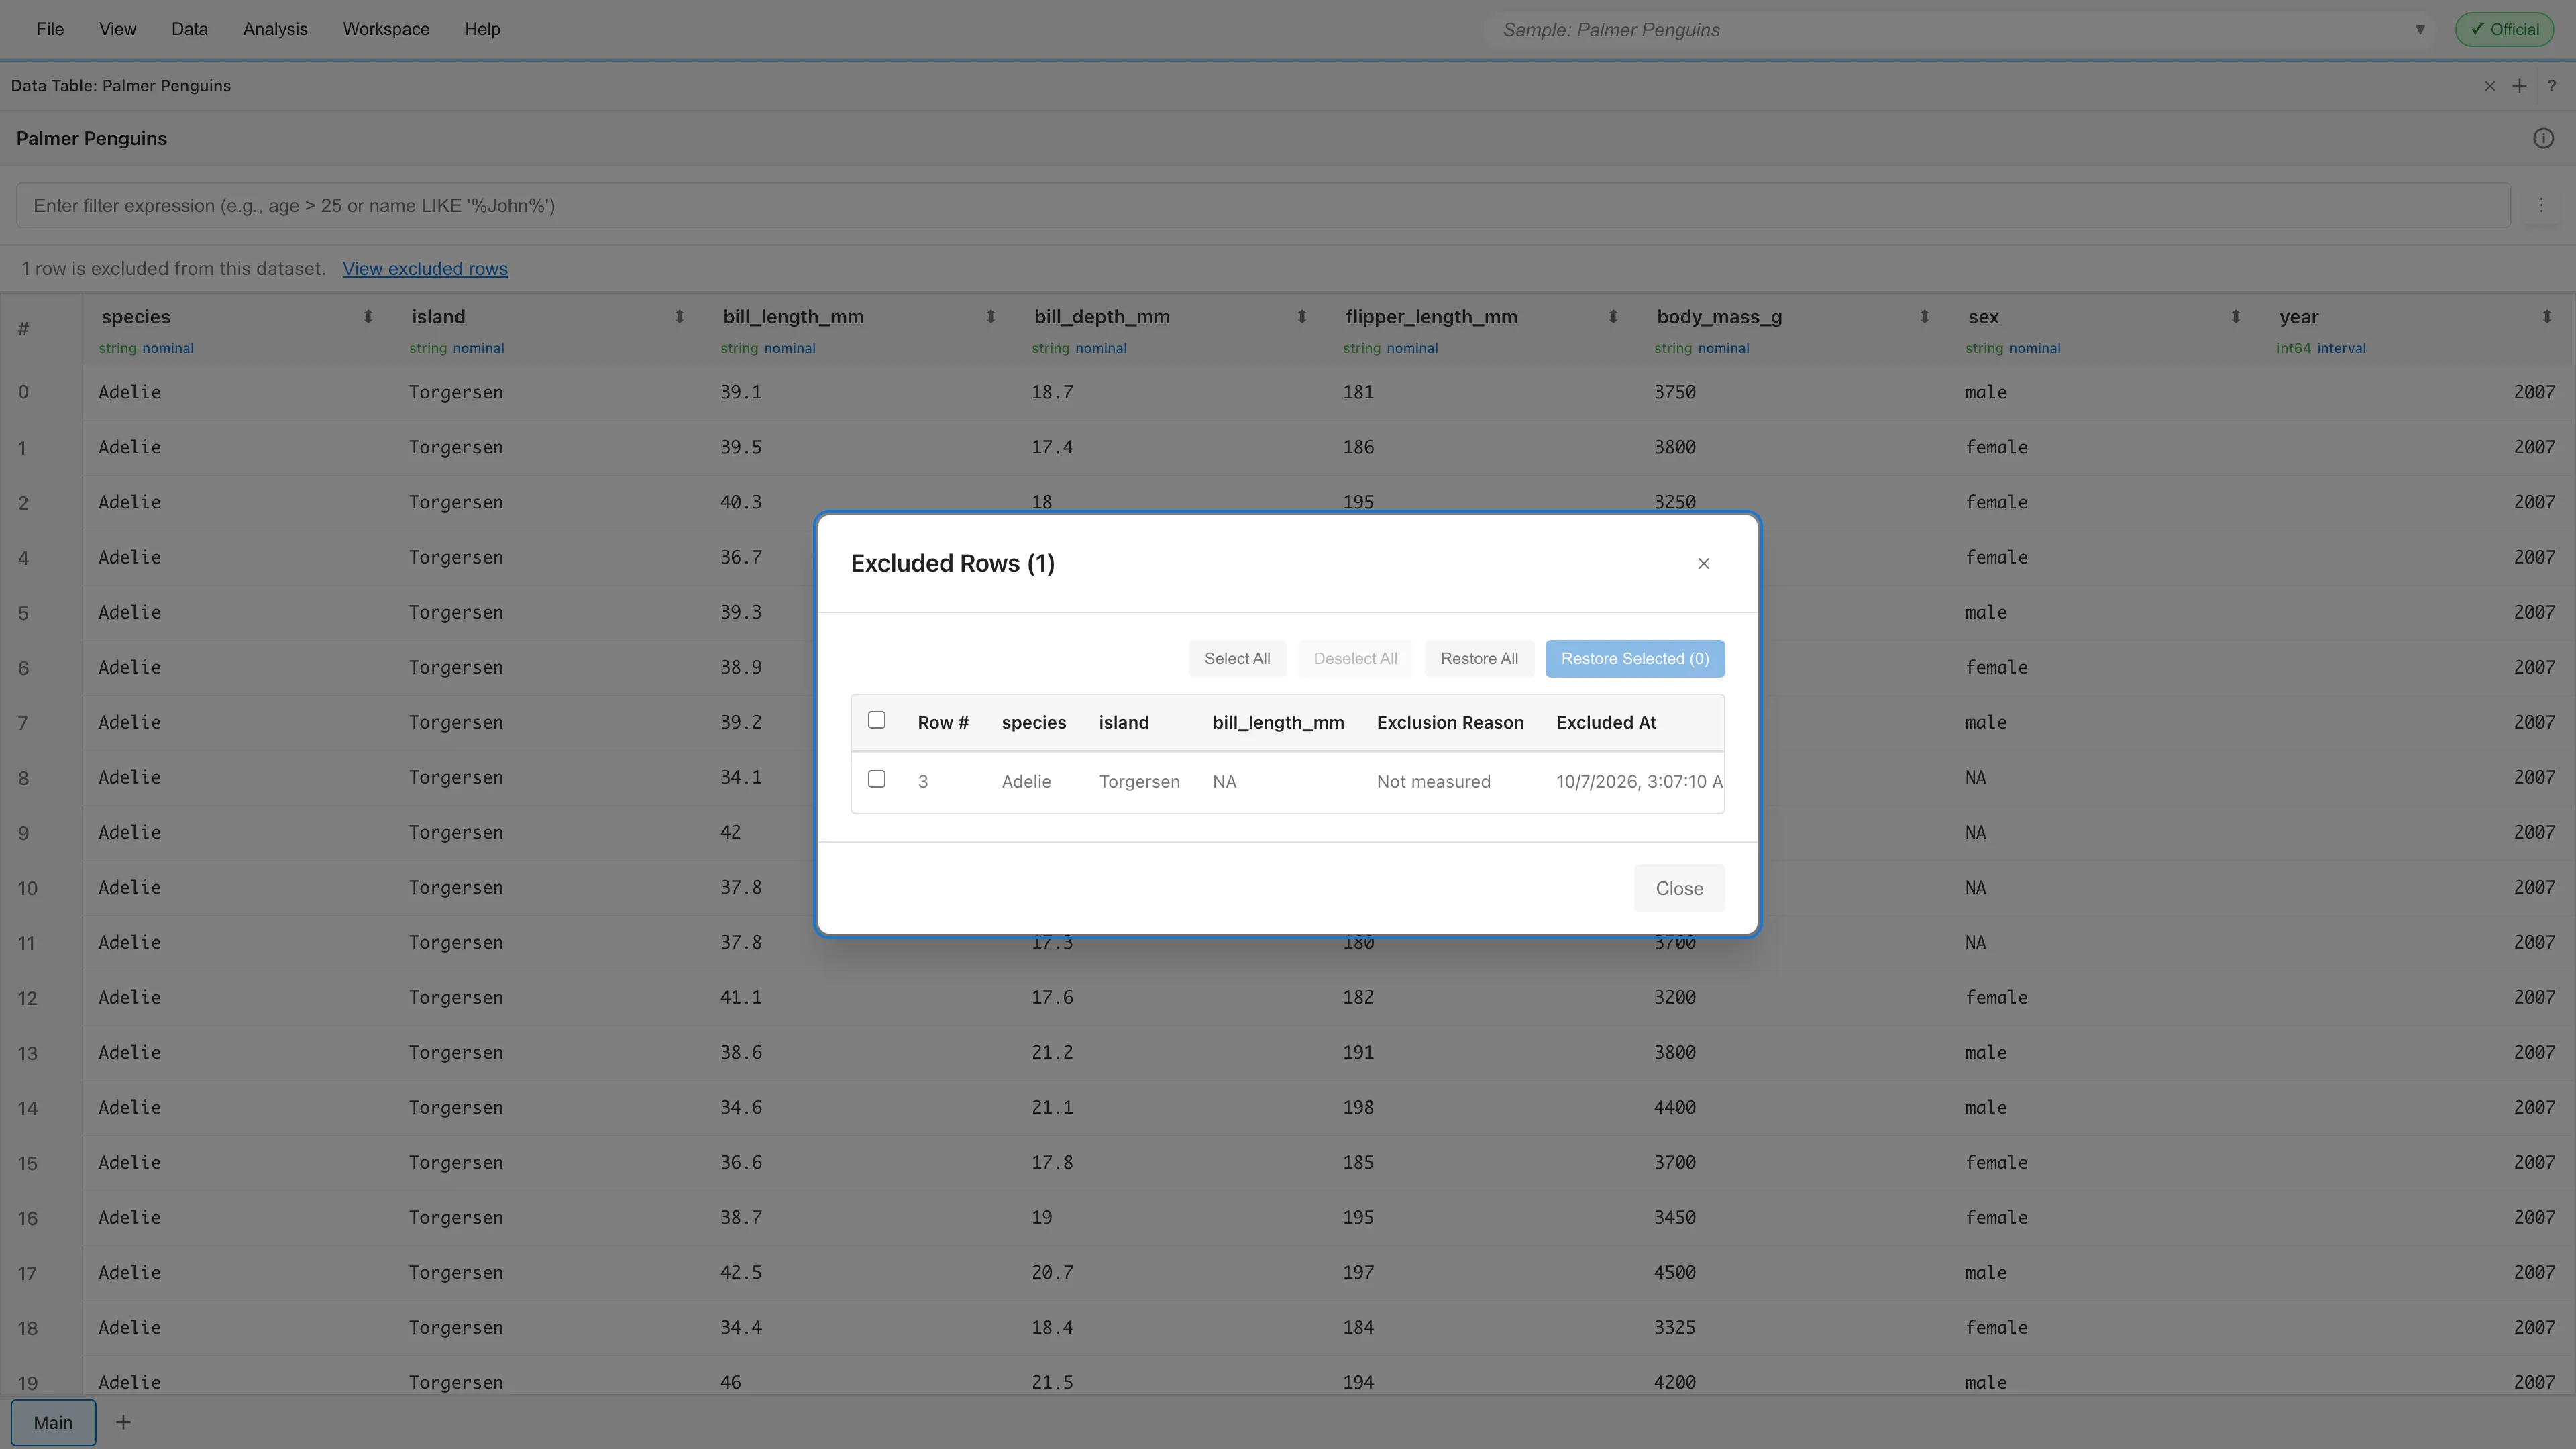
Restore excluded rows in the Excluded Rows dialog. Restore on each row restores that row, Restore Selected restores the checked rows, and Restore All restores all excluded rows. A restored row keeps the row number it had before the exclusion and returns to its position in row number order. MIDAS discards the reason and the date and time of the exclusion of a restored row. Clicking Restore All opens, before restoring, a dialog that asks you to confirm that the reasons and the dates and times will be lost.
Editing Data (Edit Mode)
Edit Mode is a mode for rewriting the cells of a Primary Dataset directly. Choose Edit Data in the table menu to enter Edit Mode. During Edit Mode, you cannot exclude or restore rows, or add or edit comments.
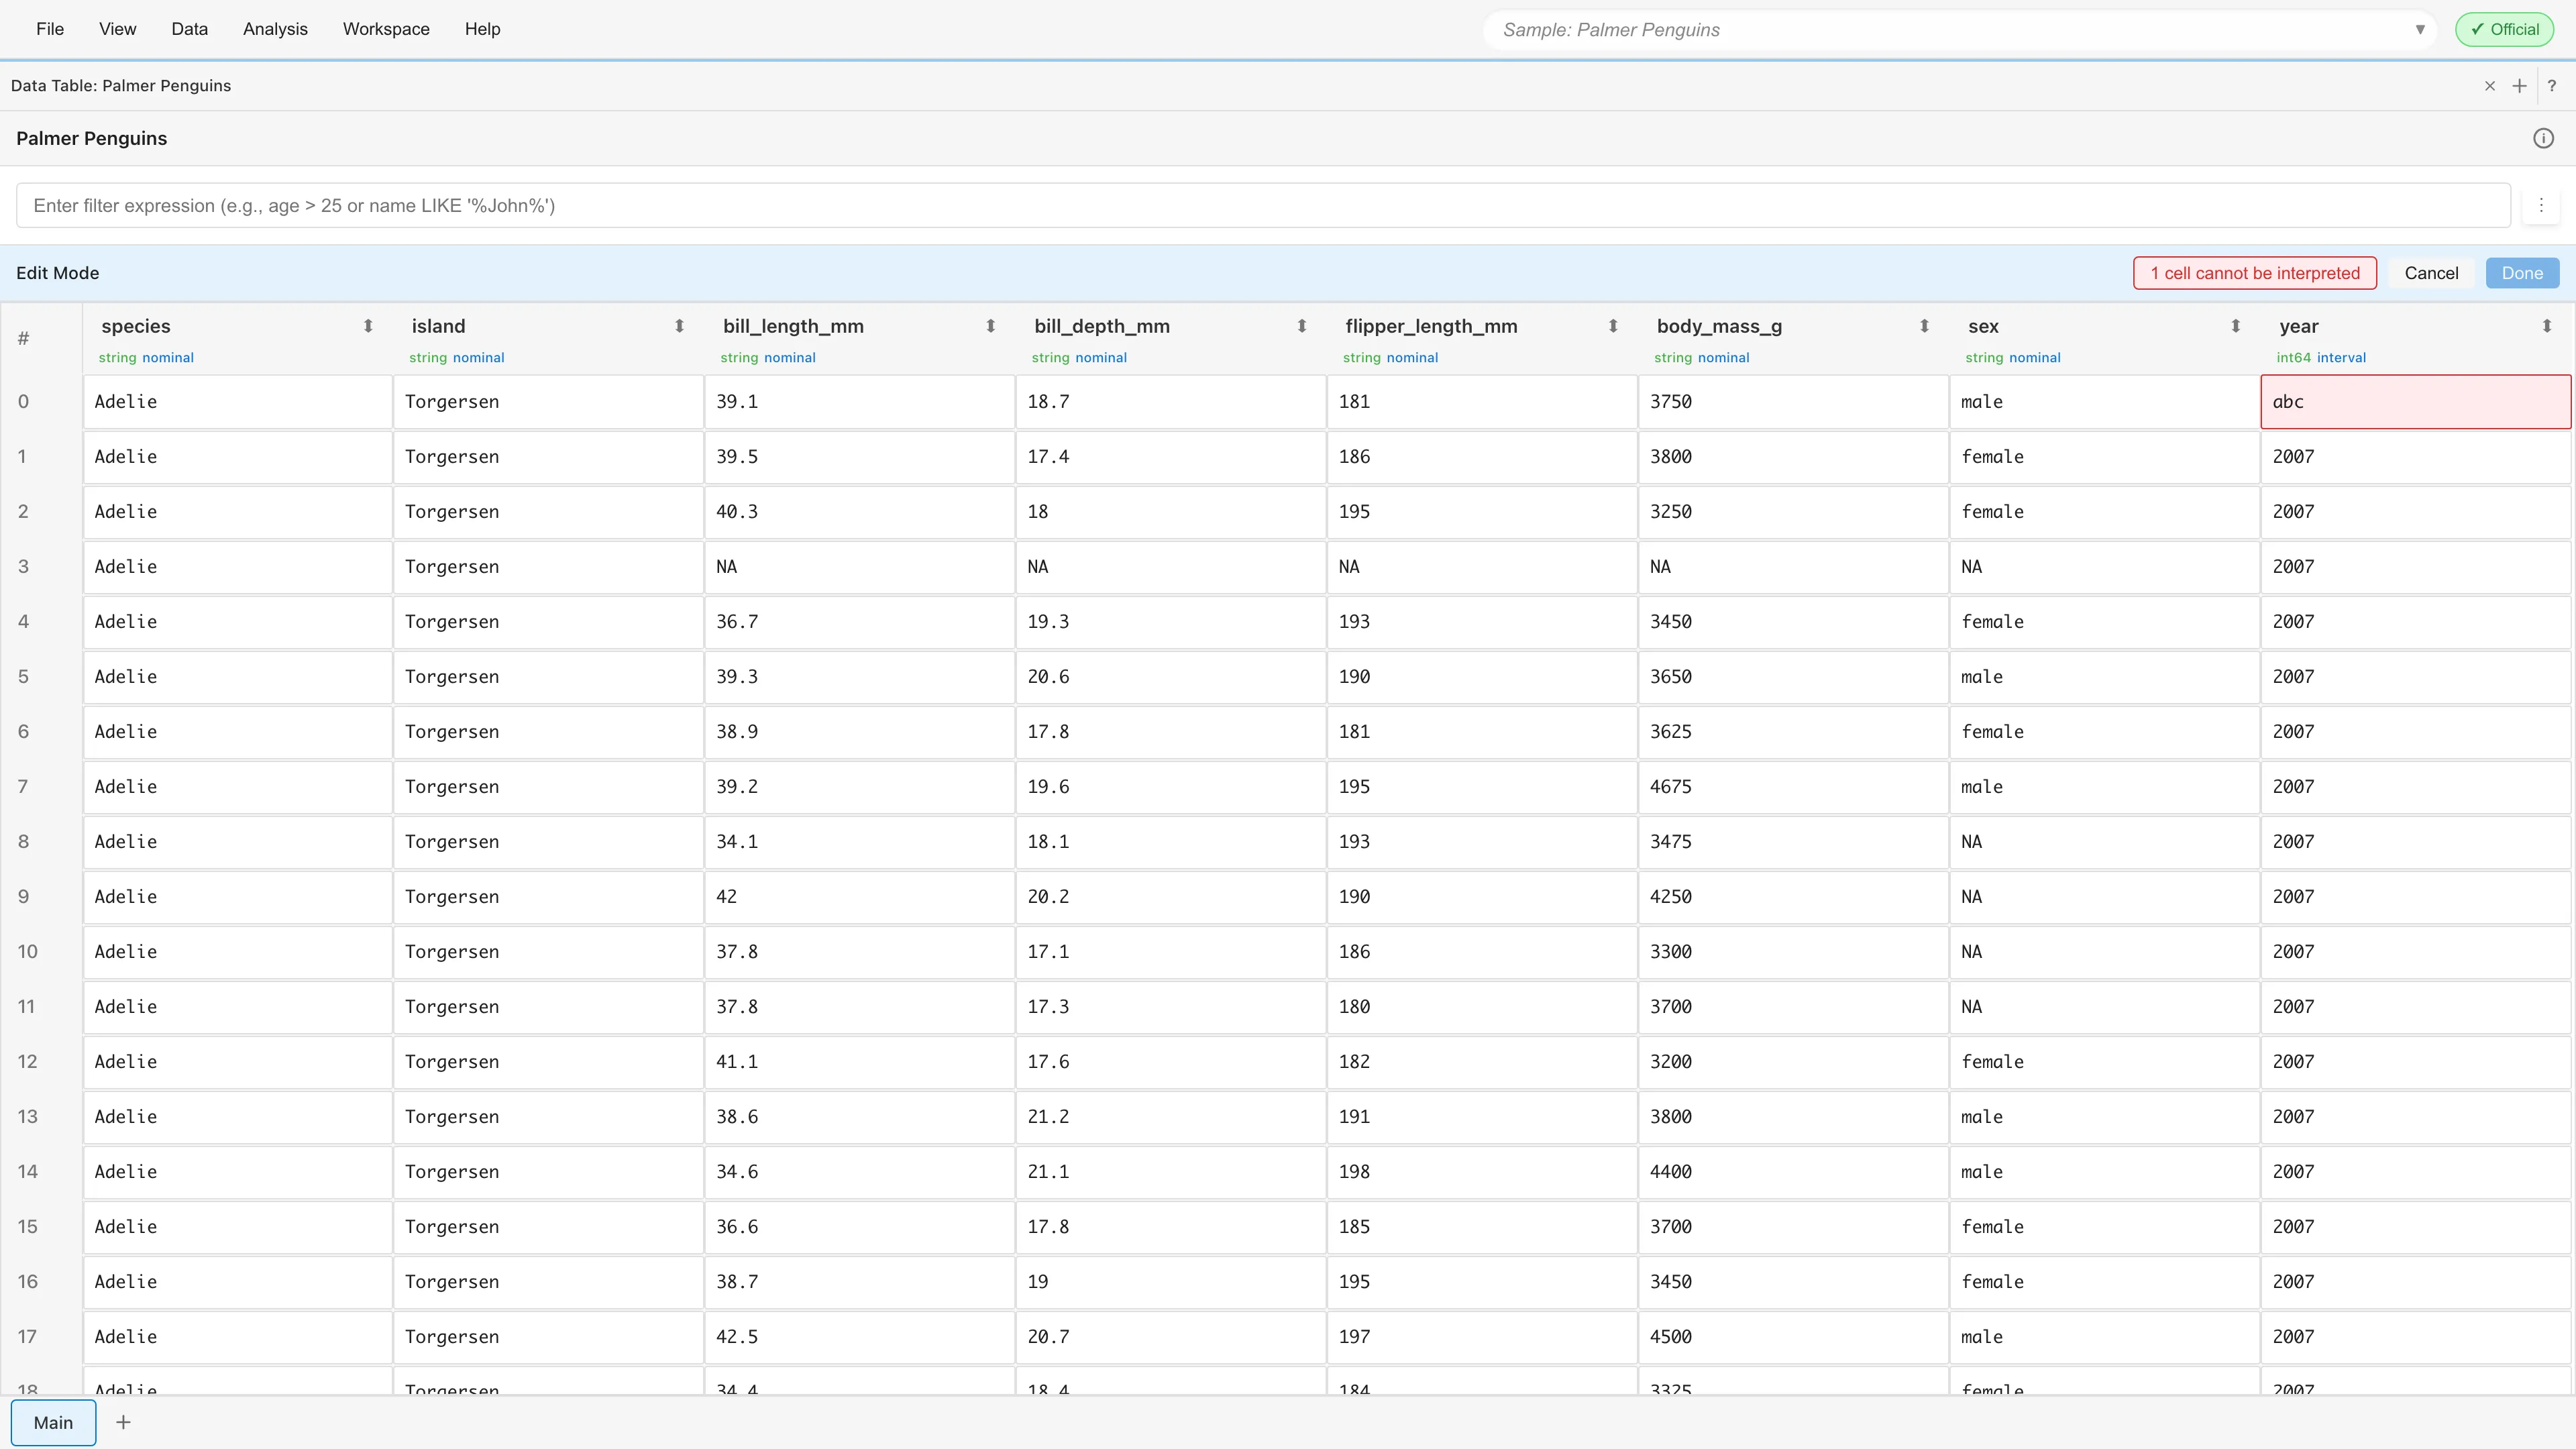
When you enter Edit Mode, the table switches to a display for editing. Cells become input fields. In a cell of a boolean column, choose the value from true and false. In a column that allows missing values, you can also choose (null). MIDAS saves an empty input, null, and (null) as a missing value.
When you enter a value that cannot be converted to the data type of the column and move to another cell, the input field gets a red border. The Edit Mode toolbar shows on a button the number of cells that hold such a value, as in "3 cells cannot be interpreted". Clicking the button moves to the first of those cells. You cannot click Done while any such cell remains.
Add a row with + Add Row at the end of the table. To delete a row, right-click its row number and choose Delete Row.
The dataset does not change until you click Done. Cancel discards all edits. When you click Done, MIDAS saves the edits and recomputes the derived datasets and models created from that dataset. For how the recomputation works, see Datasets.
Table Menu
The ⋮ button to the right of the filter input opens a menu of operations on the whole dataset. The items depend on the kind of dataset.
| Item | Shown for |
|---|---|
| Edit Data | Primary Dataset |
| Add to Report | All datasets |
| Export | All datasets |
| View SQL Query | Derived dataset created with SQL |
| Save data with project | Derived dataset |
| Reload Dataset... | Primary Dataset |
| Reload Source Dataset... | Derived dataset created from a Primary Dataset |
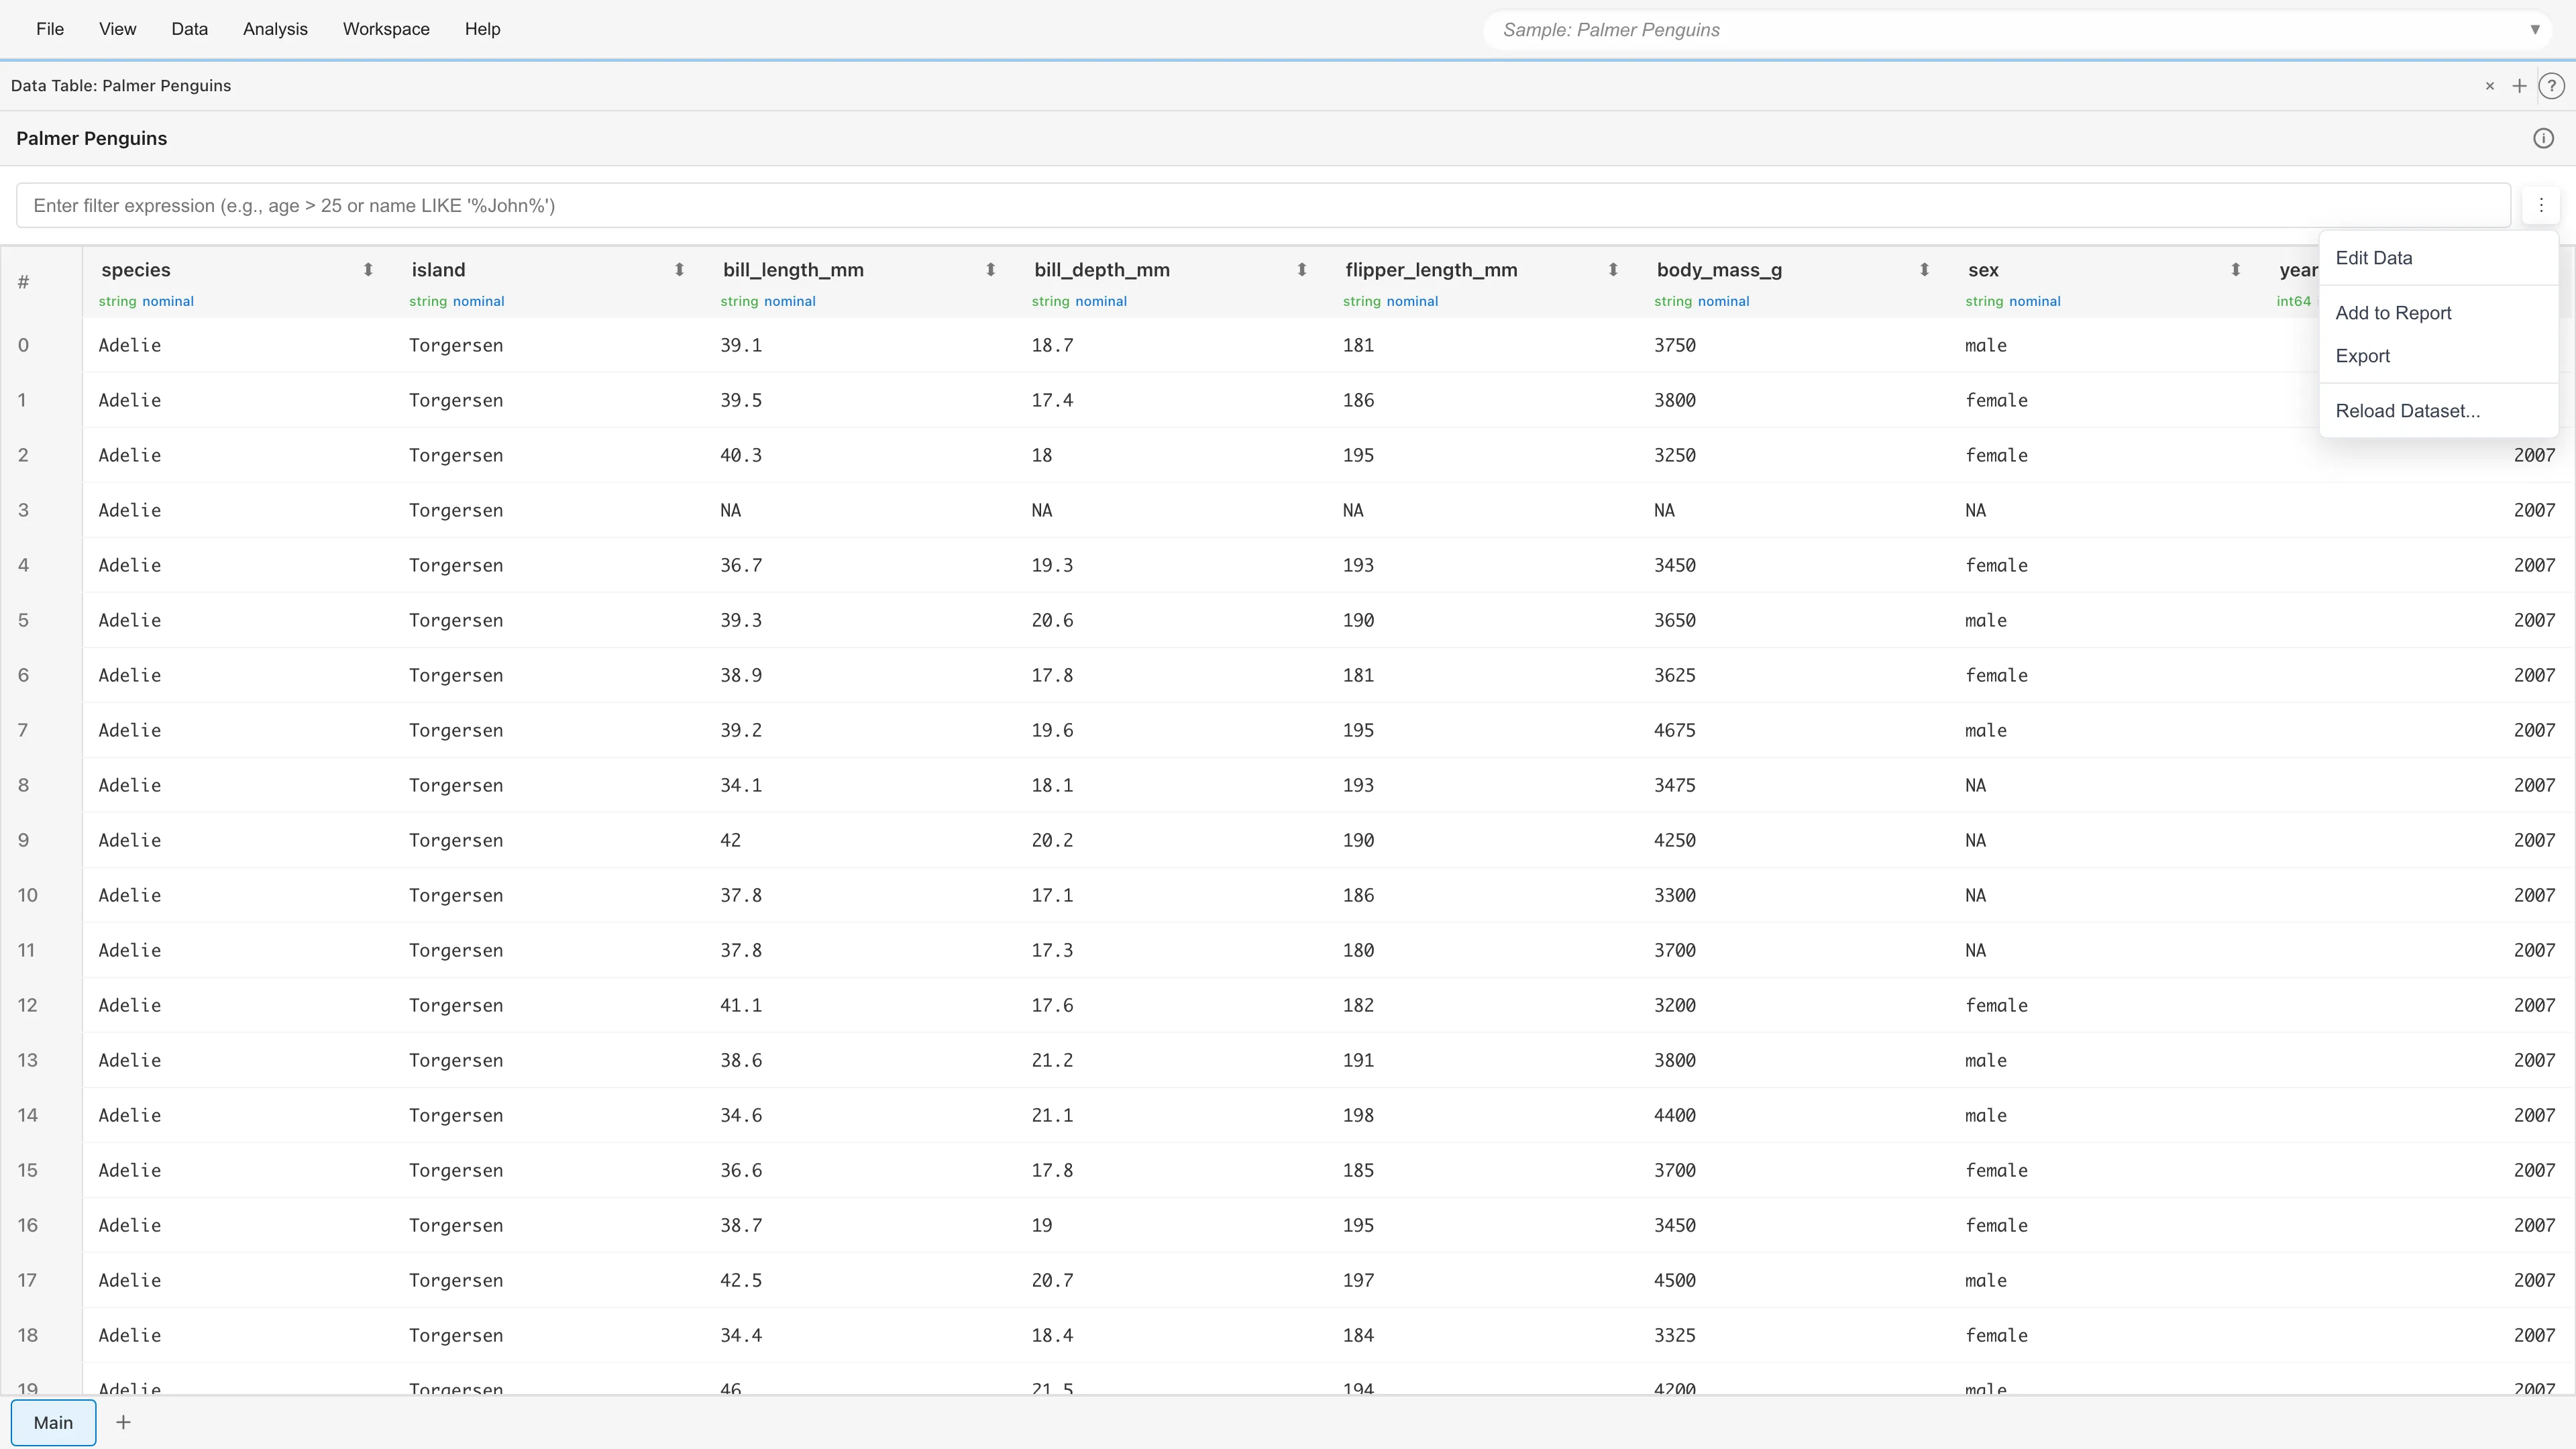
View SQL Query shows, in a separate tab, the SQL query that created the derived dataset. For editing queries, see the SQL Query Editor tab.
Save data with project includes the computed result of the derived dataset in the project file. For its effect and its impact on file size, see Datasets.
Adding to a Report
Add to Report adds the table of the displayed dataset as an element of a report. In the dialog, choose an existing report or create a new one, and specify the columns to display and the maximum number of rows. The default columns to display are the first five columns. The row number column is added at the front automatically. The default maximum number of rows is 100, and the upper limit is 1000.
The element inherits the filter of the Data Table tab it was added from and the display formats set on that tab. When a filter is active, its expression is saved in the element. The element in the report also displays only the rows filtered by that expression. For changing the columns and the number of rows after adding, see Reports.
Exporting Data
Export writes the displayed data to a CSV, TSV, or JSON file. In the dialog, specify the file name, the format, the encoding, whether to add a BOM (byte order mark), and whether to include a header row. Choose the encoding from UTF-8, Shift-JIS, and EUC-JP. For the default file name and other ways to export, see Export.
MIDAS writes only the rows that match the filter, in the order after sorting. When rows are selected, you can write only the selected rows by turning on Export selected rows only in the dialog. In this case, the filter and the sort are not applied, and the rows are written in the order of the rows in the dataset. Values being edited in Edit Mode that have not yet been saved with Done are not written.
Reloading a Dataset
Reload Dataset... replaces the rows and values of a Primary Dataset with the contents of a CSV or TSV file that is read anew. This operation is called a reload. A reload does not change the name of the dataset or its column names. Therefore, when the original file has been updated, you can recompute the derived datasets, models, and reports with the new data without recreating them.
A reload cannot be undone. A reload removes the following changes you made to the dataset in MIDAS.
- Row exclusions and the reasons for them
- Comments added to rows
- Values rewritten and rows added or deleted in Edit Mode
- Display formats set on the dataset
The reload dialog shows a warning with the number of exclusions and comments that will be removed. Edits made in Edit Mode and display formats are not covered by the warning.
The following do not change after a reload.
- The name of the dataset
- Column names changed with Edit Column Name
- Measurement scales set manually
- Data types of columns
- Display formats set on a Data Table tab
The name of the dataset does not change even when the new file has a different file name.
MIDAS recomputes the derived datasets and models created from the reloaded dataset with the new data. For how the recomputation works, see Datasets.
A reload is possible when the new file satisfies all of the following conditions. If you choose a file that does not satisfy them, MIDAS cancels the reload and shows the reason in the dialog. The dataset does not change in this case.
- All current columns are present in the new file
- For columns whose data type is not string, all values in the new file can be converted to that data type
- The reload does not produce two columns with the same column name
- Every row has the same number of columns as the header (the first row when there is no header row)
- Every quoted value is closed correctly
- No row is longer than 64 MB
- The file does not mix line break types (CR, LF, CRLF)
- The whole file can be decoded with the auto-detected encoding
MIDAS matches the current columns with the columns of the new file by column name. Whether the new file has a header row is treated as the same as the setting used at the first import. A column whose name you changed with Edit Column Name is matched by the column name in the header at import, before the change. Therefore, even if you changed column names in MIDAS, keep the header of the new file with the same column names as the original file. When a column is missing, MIDAS shows an error with "Missing column" followed by the name of the missing column.
The data type condition is checked only when the Primary Dataset has columns other than string. When a value cannot be converted, MIDAS shows an error with the column name and the number of values that cannot be converted. In a Primary Dataset read from a CSV or TSV file, all columns are string. The data types of columns are converted in a derived dataset. When a column converted in the derived dataset has a value that cannot be converted, the value is handled according to the settings in the Convert Column Types tab.
A reload is possible even when the new file has more columns, a different column order, or a different number of rows. The added columns join the dataset as new columns. However, a file in which the name of an added column is the same as a column name you changed with Edit Column Name cannot be reloaded, because the reload would produce two columns with the same column name.
Choose the source to read with the following buttons in the dialog.
| Button | Source | Shown when |
|---|---|---|
| Reload from URL | The URL used at import | The dataset was read from a URL |
| Reload from file | The file chosen at the previous reload | MIDAS remembers the file chosen previously |
| Select file to reload | A file you choose on the spot | Always |
Choose the delimiter for reading the new file with Delimiter in the dialog. The default is the delimiter recorded in the dataset3. After a successful reload, MIDAS records the chosen delimiter and uses it as the default for the next reload. When the recorded delimiter differs from that of the new file, choose it here.
Reload from file reads the latest contents without choosing the file again. The browser may ask for permission to read the file. When the file has been moved or deleted, MIDAS shows an error. In that case, choose the file again with Select file to reload.
When you reload a dataset that was read from a URL with Select file to reload, its source changes to that file. From then on, the dialog does not show Reload from URL.
In the tab of a derived dataset, Reload Source Dataset... reloads the source Primary Dataset. When there are several source Primary Datasets, choose the one to reload in the selection dialog.
Data > Reload All Datasets in the menu bar reloads the Primary Datasets in the project together. The targets are the datasets read from a URL and the datasets for which MIDAS remembers the file chosen previously. The confirmation dialog shows the list of targets and the number of exclusions and comments that will be removed.
See also
- How Row Selection Works -- How to select rows in each tab and how the selection is linked across tabs
- The Filtered Data Tab -- The filtered view opened from graphs and cross tabulations
- Datasets -- The relationship between Primary Datasets and derived datasets
- Export -- Exporting data, graphs, and projects
- Reports -- Editing and printing report elements
Footnotes
-
The table renders only the rows visible on screen and replaces them as you scroll. The number of rendered rows stays constant regardless of the number of rows in the dataset. ↩
-
The
WHEREclause in the SQL Query Editor tab does not follow this rule.WHERE species != 'Adelie'does not match the rows wherespeciesis missing. ↩ -
This is usually the delimiter the dataset was last read with. A dataset imported with a version of MIDAS that did not record the delimiter has a delimiter determined from the extension of the original file name (tab for
.tsvand.txt, comma otherwise). ↩
Also available as a Markdown file.